Setting up SSM agent
General information
AutoPatcher uses AWS SSM to access machines which are going to be patched. To make a machine accessible for AutoPatcher via SSM you need to install an SSM agent on the machine (please note that most of AWS EC2 machines have the SSM agent already installed). The agent is then used to run commands required to patch the machine and report about patching status. The firewall on the target machine should be configured properly, for details visit Firewall configuration.
SSM agent requirements
- Outbound Internet connection from instance (inbound not required) to HTTPS (port number 443)
- PowerShell >= 3.0 for Windows
Check if SSM Agent is running
Linux
$ sudo service status amazon-ssm-agent> amazon-ssm-agent start/running, process 2215
Windows
Use Windows Task Manager.
Agent installation/configuration
- For AWS EC2 machines which have the agent already installed read here
- For hybrid machines (Azure/GCP/on-premise) or EC2 instances without an SSM agent read here
After install
Ping
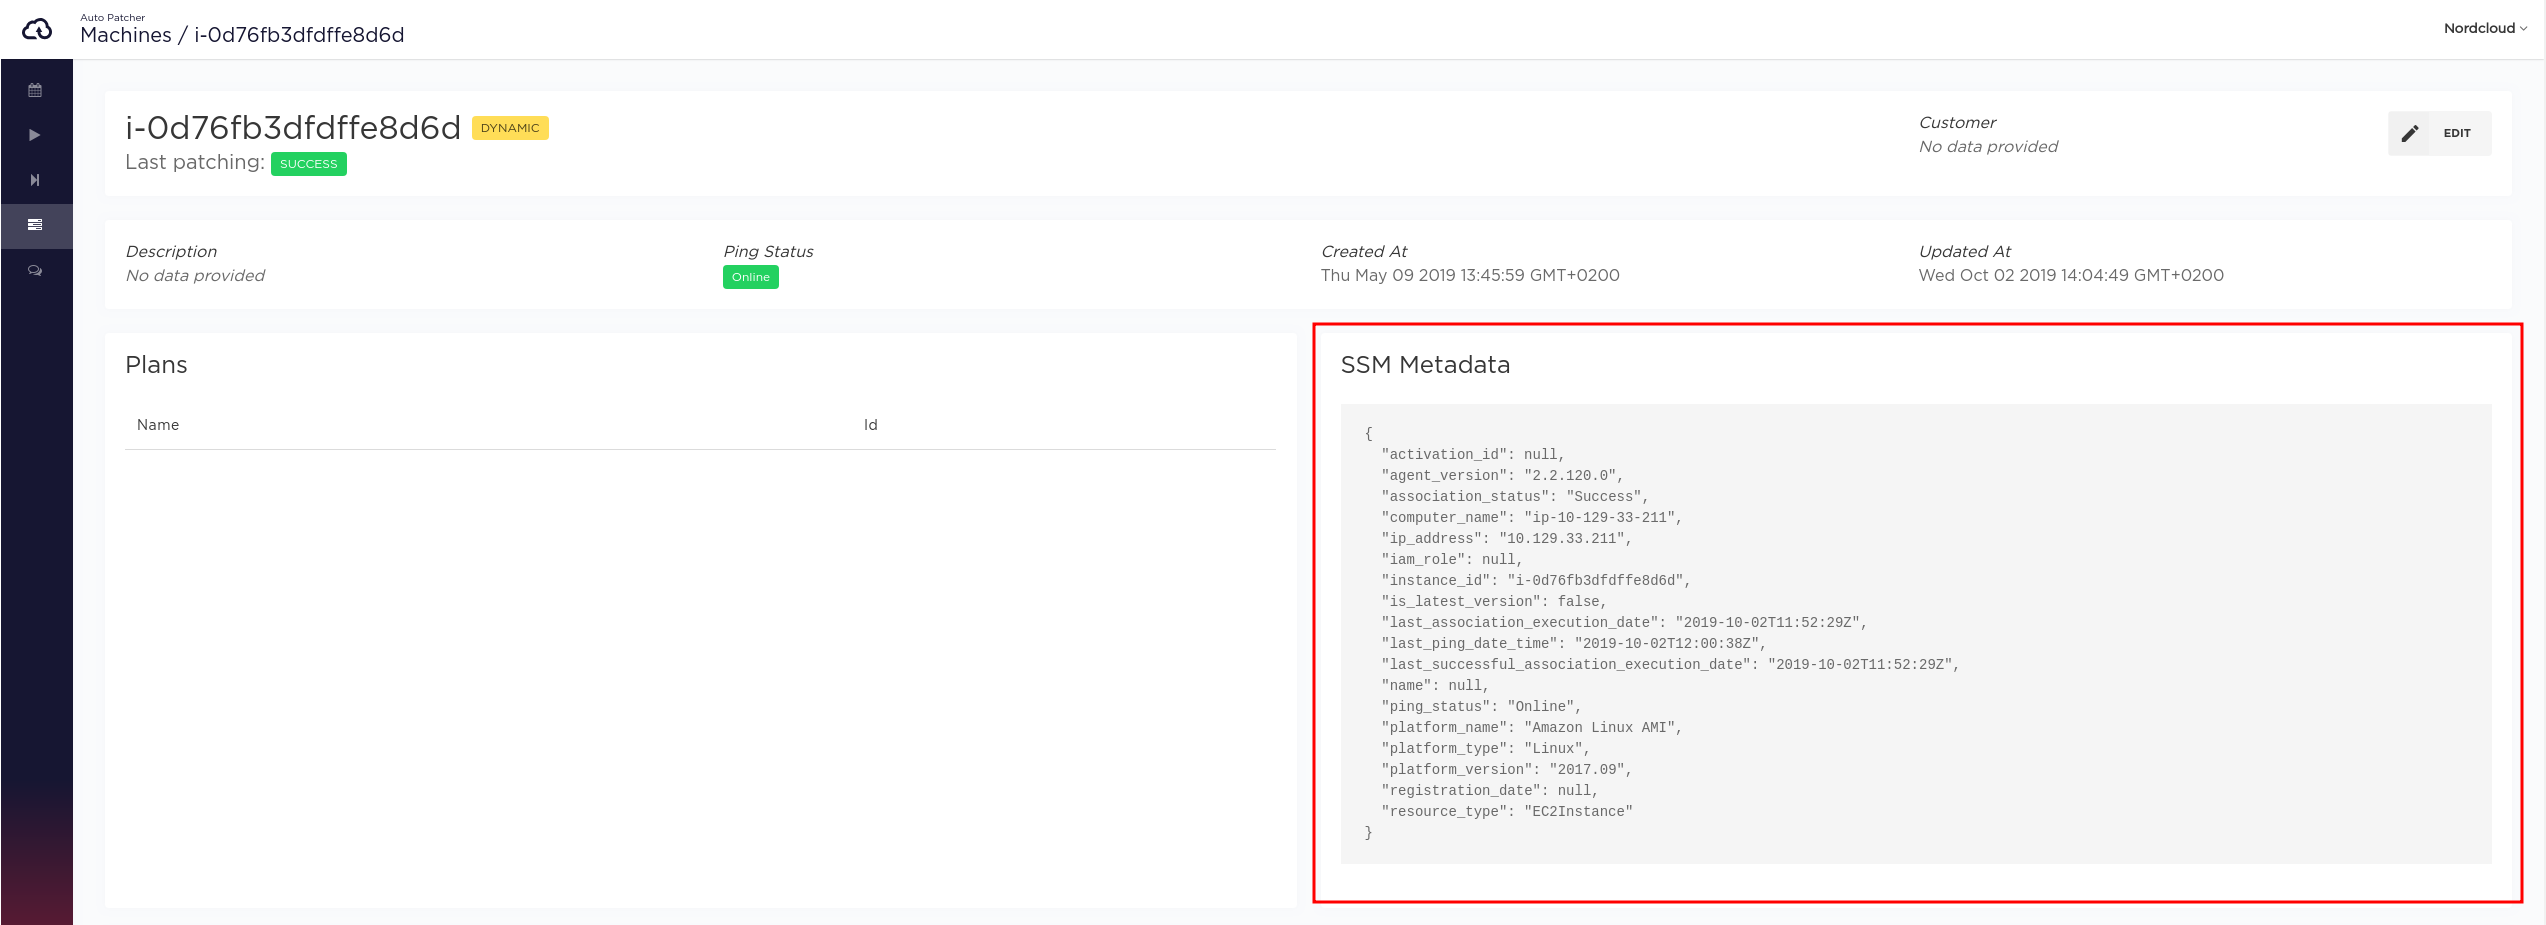
After successful installation and registration in AutoPatcher, metadata from the machine will be extracted every hour (using SSM Ping). The result will be available in the SSM Metadata field in single machine view.

AutoPatcher IAM and Hybrid Mode
SSM agents, installed on machines, can be accessed by AutoPatcher in two ways:
- IAM mode - All machines are registered in the customer account. AutoPatcher then assumes a role to get access to these machines - this should be the default way to register EC2 instances - read more.
- Hybrid mode - Allows updating machines without having IAM role in the customer account. It can be also used to update Azure or Google machines. Hybrid mode is not recommended for EC2 instances since SSM agent is by default used by all EC2 instances for some other things (ie custom Cloudwatch metrics) - so running an agent in hybrid mode could lead do unexpected problems - read more.
Setting up SSM in IAM mode
NOTE
This solution is recommended for all EC2 instances.
By default, SSM agent is pre-installed on the following AMI's:
- Windows Server (all SKUs)
- Amazon Linux
- Amazon Linux 2
- Ubuntu Server 16.04
- Ubuntu Server 18.04
If you are using one of these AMI's, you can skip the agent installation step and just create the required IAM Roles/Policies.
EC2 instance profile configuration
Each EC2 instance in the customer AWS account which is intended to be patched by AutoPatcher should have the following IAM managed policies attached to the IAM role related to its Instance profile:
- Builtin AWS IAM managed policy -
arn:aws:iam::aws:policy/AmazonSSMManagedInstanceCore. Read more about it. - Custom AutoPatcher policy. Read more about how to use the correct policy for your customer's account.
Policies details
Builtin AWS policy
The arn:aws:iam::aws:policy/AmazonSSMManagedInstanceCore builtin AWS IAM managed policy needs to be attached
to the EC2 instance profile so that the instance can properly integrate with the SSM service through SSM Agent
and execute basic SSM patching documents.
AutoPatcher policy
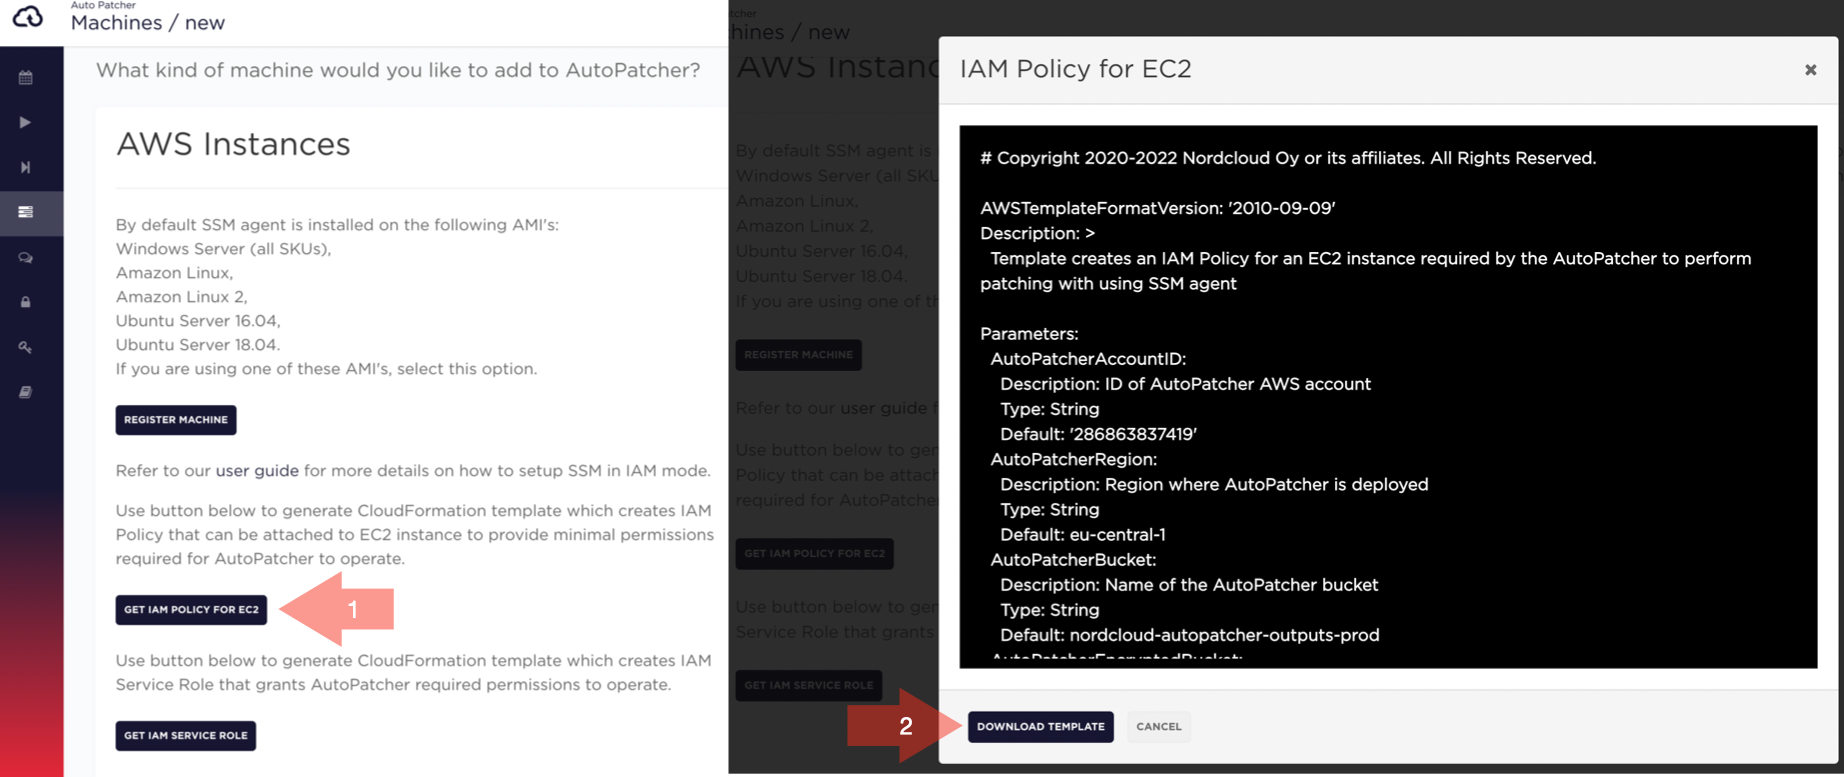
The custom IAM policy containing permissions specific to AutoPatcher needs to be created in the customer AWS account via deploying the auto-generated CloudFormation template.
To download this template navigate to NEW MACHINE page:
- Click on GET IAM POLICY FOR EC2 button (a popup window with template preview will appear)
- Click DOWNLOAD TEMPLATE button

Generated policy has minimal permissions required by AutoPatcher to operate with selected configuration.
It includes permissions for S3 buckets provisioned for storing logs in encrypted and/or dedicated region if such was selected during customer onboarding.
NOTES
- policy name can be changed with parameter:
CreatedPolicyName - default S3 bucket names can be changed with parameters:
AutoPatcherBucket,AutoPatcherEncryptedBucket
Checking instance access
To check if an instance is accessible via SSM, do the following steps: Systems Manager -> Node Management -> Fleet Manager -> Managed Instances. The instance should be listed.

If it is not, you must configure the SSM agent. The simplest way to do so is by using AutoPatcher Installer tool.
The instructions for manual agent installation and configuration can be found in the AWS SSM documentation:
IAM Service Role for AutoPatcher to operate
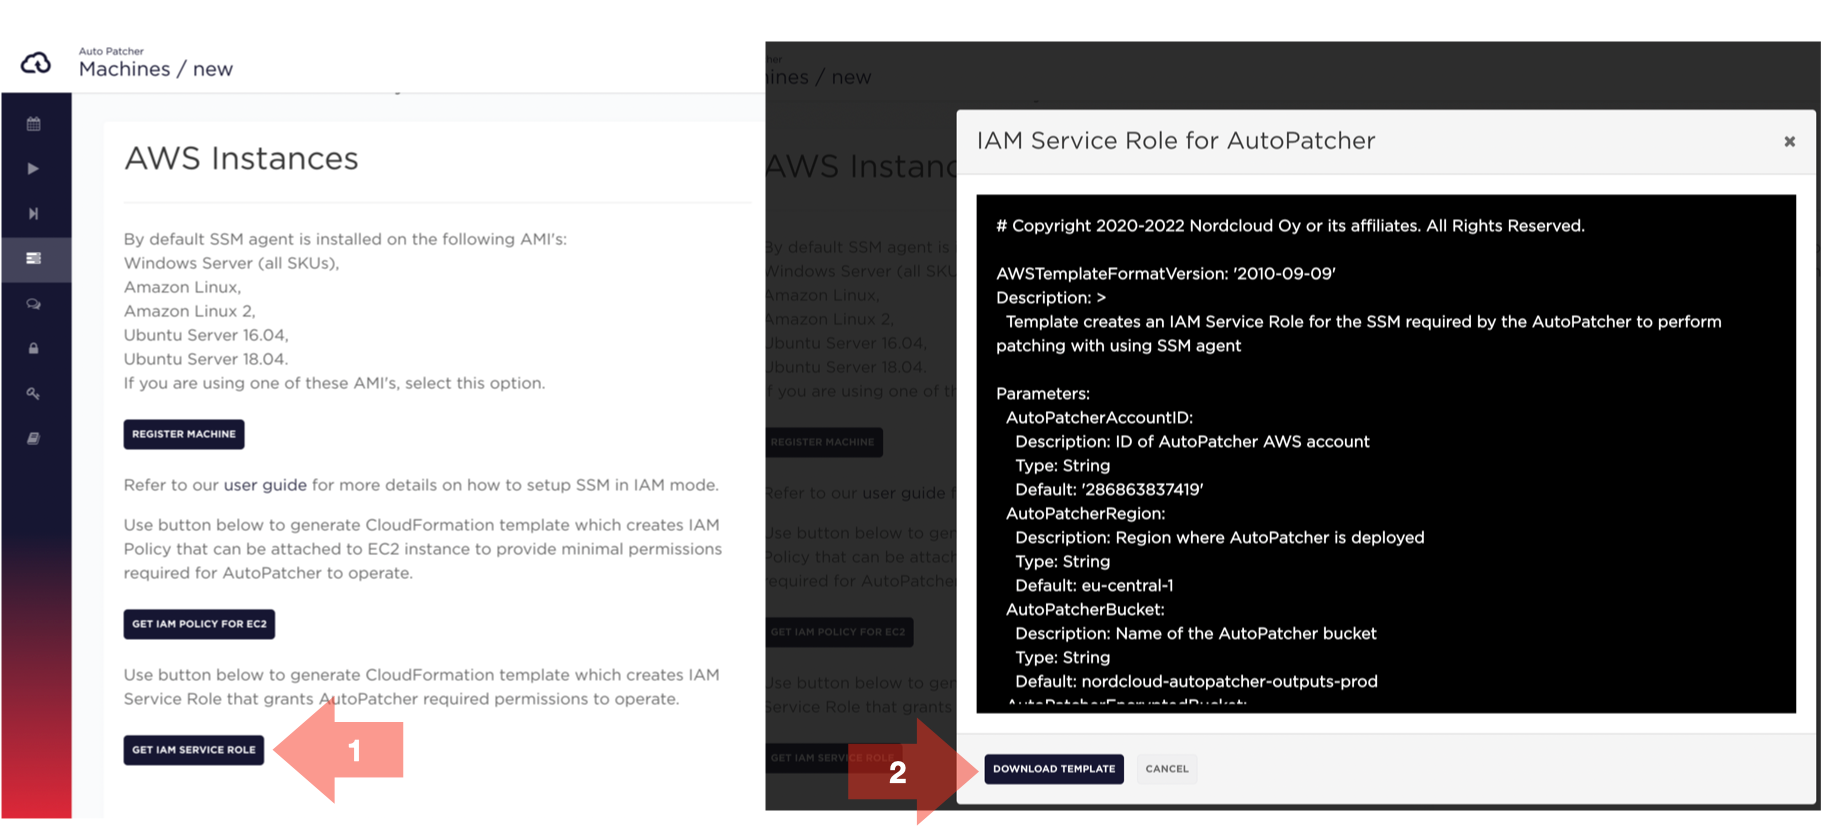
AutoPatcher provides auto-generated CloudFormation template to create IAM service role with a default name: NordcloudAutoPatcherSSMServiceRole.
To download service role template navigate to NEW MACHINE page:
- Click on GET IAM SERVICE ROLE button (a popup window with template preview will appear)
- Click DOWNLOAD TEMPLATE button

Using the deployed IAM service role
As a result of this template, AutoPatcher creates IAM Service Role with Inline Policy NordcloudAutoPatcherSSM.
The ARN of this role needs to be specified in the AutoPatcher GUI (or API) in the IAM role field
while adding EC2 machines from this AWS account.
NOTES
- policy includes permissions to access S3 buckets provisioned for storing logs in encrypted and/or dedicated region if such was configured for customer
- service role name can be changed with parameter:
CreatedServiceRoleName - default S3 bucket names can be change with parameters:
AutoPatcherBucket,AutoPatcherEncryptedBucket ec2:DescribeInstancespermission is optional and is used to retrieve EC2 instance'sNametag value or stopping/stopped instances in Dynamic Plans
Setting up SSM in Hybrid mode
This method is intended for Azure/on-premise machines. Please use this method with AWS machines only if IAM mode is not possible.
Automatic installation
AutoPatcher provides an Installer tool which is a statically compiled executable. It is intended to be downloaded and executed on a machine itself to register it in AutoPatcher using provided Installer key. It handles the installation and registration of the SSM Agent automatically.
NOTE
The firewall on the machine being registered should be able to make calls to
https://vv78e7dv4f.execute-api.eu-central-1.amazonaws.com/prod URL.
This is an API for registering machines from the hybrid environments in AutoPatcher.
If the machine has the Internet access only through a proxy, please read the following section for further instruction: Proxy settings
Step 1. Obtain the Installer key
In order to register your machine in AutoPatcher using AutoPatcher Installer tool you need to get a secret key called an Installer key for your customer environment. For that use the following CLI command (if you are unfamiliar with the AutoPatcher CLI, please visit this page):
nc-autopatcher-cli customer generate-installer-key
The output will look like this:
{"customer_id": "f240531ba058494fa360051bf270a7ee","key_id": "20210304-082849_0b04456f-cc14-4d51-82ff-d5f968fbdf77","secret": "3fc8ccd2-2b05-4d71-b829-ac3f2d5db833"}
IMPORTANT installer key considerations
- The
secretvalue from the newly generated key cannot be obtained later, so it should be stored in a secured manner. - The number of installer keys is limited to 3 (three) per customer.
- To get the list of currently existing installer keys use the following CLI command:
nc-autopatcher-cli customer list-installer-keys
- To delete a specific installer key use the following CLI command:
nc-autopatcher-cli customer delete-installer-key --key-id <INSTALLER KEY ID>
Step 2. Download AP Installer tool
AP installer tool is provided in a form of a single pre-built executable.
Download the latest version (v1.124.0) of ap-installer for your platform and architecture:
You can copy the appropriate link and use it to download the executable directly on the machine you wish to register. Examples:
Linux
- Without proxy
wget https://auto-patcher-core-prod-integratorcliuploadbucket-x9ofi9eidydb.s3.amazonaws.com/ap-installer-linux-prod -O ap-installerchmod +x ap-installer
- With proxy
export HTTPS_PROXY=<protocol>://<host>:<port>wget https://auto-patcher-core-prod-integratorcliuploadbucket-x9ofi9eidydb.s3.amazonaws.com/ap-installer-linux-prod -O ap-installerchmod +x ap-installer
Windows (PowerShell)
- Without proxy
Invoke-WebRequest -Uri https://auto-patcher-core-prod-integratorcliuploadbucket-x9ofi9eidydb.s3.amazonaws.com/ap-installer-windows-prod.exe -OutFile ap-installer.exe
- With proxy
Invoke-WebRequest -Proxy <protocol>://<host>:<port> -Uri https://auto-patcher-core-prod-integratorcliuploadbucket-x9ofi9eidydb.s3.amazonaws.com/ap-installer-windows-prod.exe -OutFile ap-installer.exe
Step 3. Usage
NOTE
On Linux machines all commands provided below should be executed
as root (prefixed by sudo or inside a root shell (sudo su))
Basic usage (simple machine registration)
./ap-installer INSTALLER_KEY [options]
Add machine to existing plan(s) after registration
./ap-installer INSTALLER_KEY PLAN_ID_1 PLAN_ID_2 ... [options]
Note that PLAN_ID_* can also be an ID of the plan in a pipeline.
Use custom proxy settings
./ap-installer --http-proxy=<protocol>://<host>:<port> --https-proxy=<protocol>://<host>:<port> --no-proxy <IPs-to-skip-proxy-for> INSTALLER_KEY PLAN_ID_1 PLAN_ID_2 ... [options]
As a result of the above command the proxy settings specified in the command line will be stored for the SSM Agent to use. Please note that the proxy environment variables are not automatically propagated to the SSM Agent settings, the user needs to set the proxy command line flags explicitly.
Options description
--allow-reboot- whether to reboot machine after patching (default false). Deprecated: usereboot-policyflag--description- an arbitrary machine description--update-category- comma-separated list of update categories (only for Windows machines)--update-severity- comma-separated list of update severities (only for Windows machines)--reboot-policy- reboot policy machine after update. Available values: NEVER, IF_NEEDED, ALWAYS--machine-name- custom machine name--metadata- custom machine metadata, in a map format:"a=b,c=d"ora=b,c=d--azure-subscription-id- Azure Subscription ID. This parameter will override Azure metadata--azure-subscription-name- Azure Subscription name--azure-resource-group-name- Azure resource group name. This parameter will override Azure metadata--http-proxy- Proxy URL for thehttp://protocol--https-proxy- Proxy URL for thehttps://protocol--no-proxy- URLs/IPs for which the proxy should not be used
Options examples
Reboot policy
./ap-installer INSTALLER_KEY PLAN_ID --reboot-policy ALWAYS
Custom metadata
./ap-installer INSTALLER_KEY PLAN_ID --metadata "a=b,c=d,e=f"
Azure metadata
./ap-installer INSTALLER_KEY PLAN_ID --azure-resource-group-name test-group --azure-subscription-id 291bba3f-e0a5-47bc-a099-3bdcb2a50a05 --azure-subscription-name sub-name
Update severity and category (only for Windows machines)
.\ap-installer.exe INSTALLER_KEY PLAN_ID --update-severity Critical,Important,Low --update-category CriticalUpdates,Drivers,DefinitionUpdates
Manual installation
However, if for some reason there's a need to just install the SSM agent for the later use the following steps can be performed.
Step 1. Getting activation information
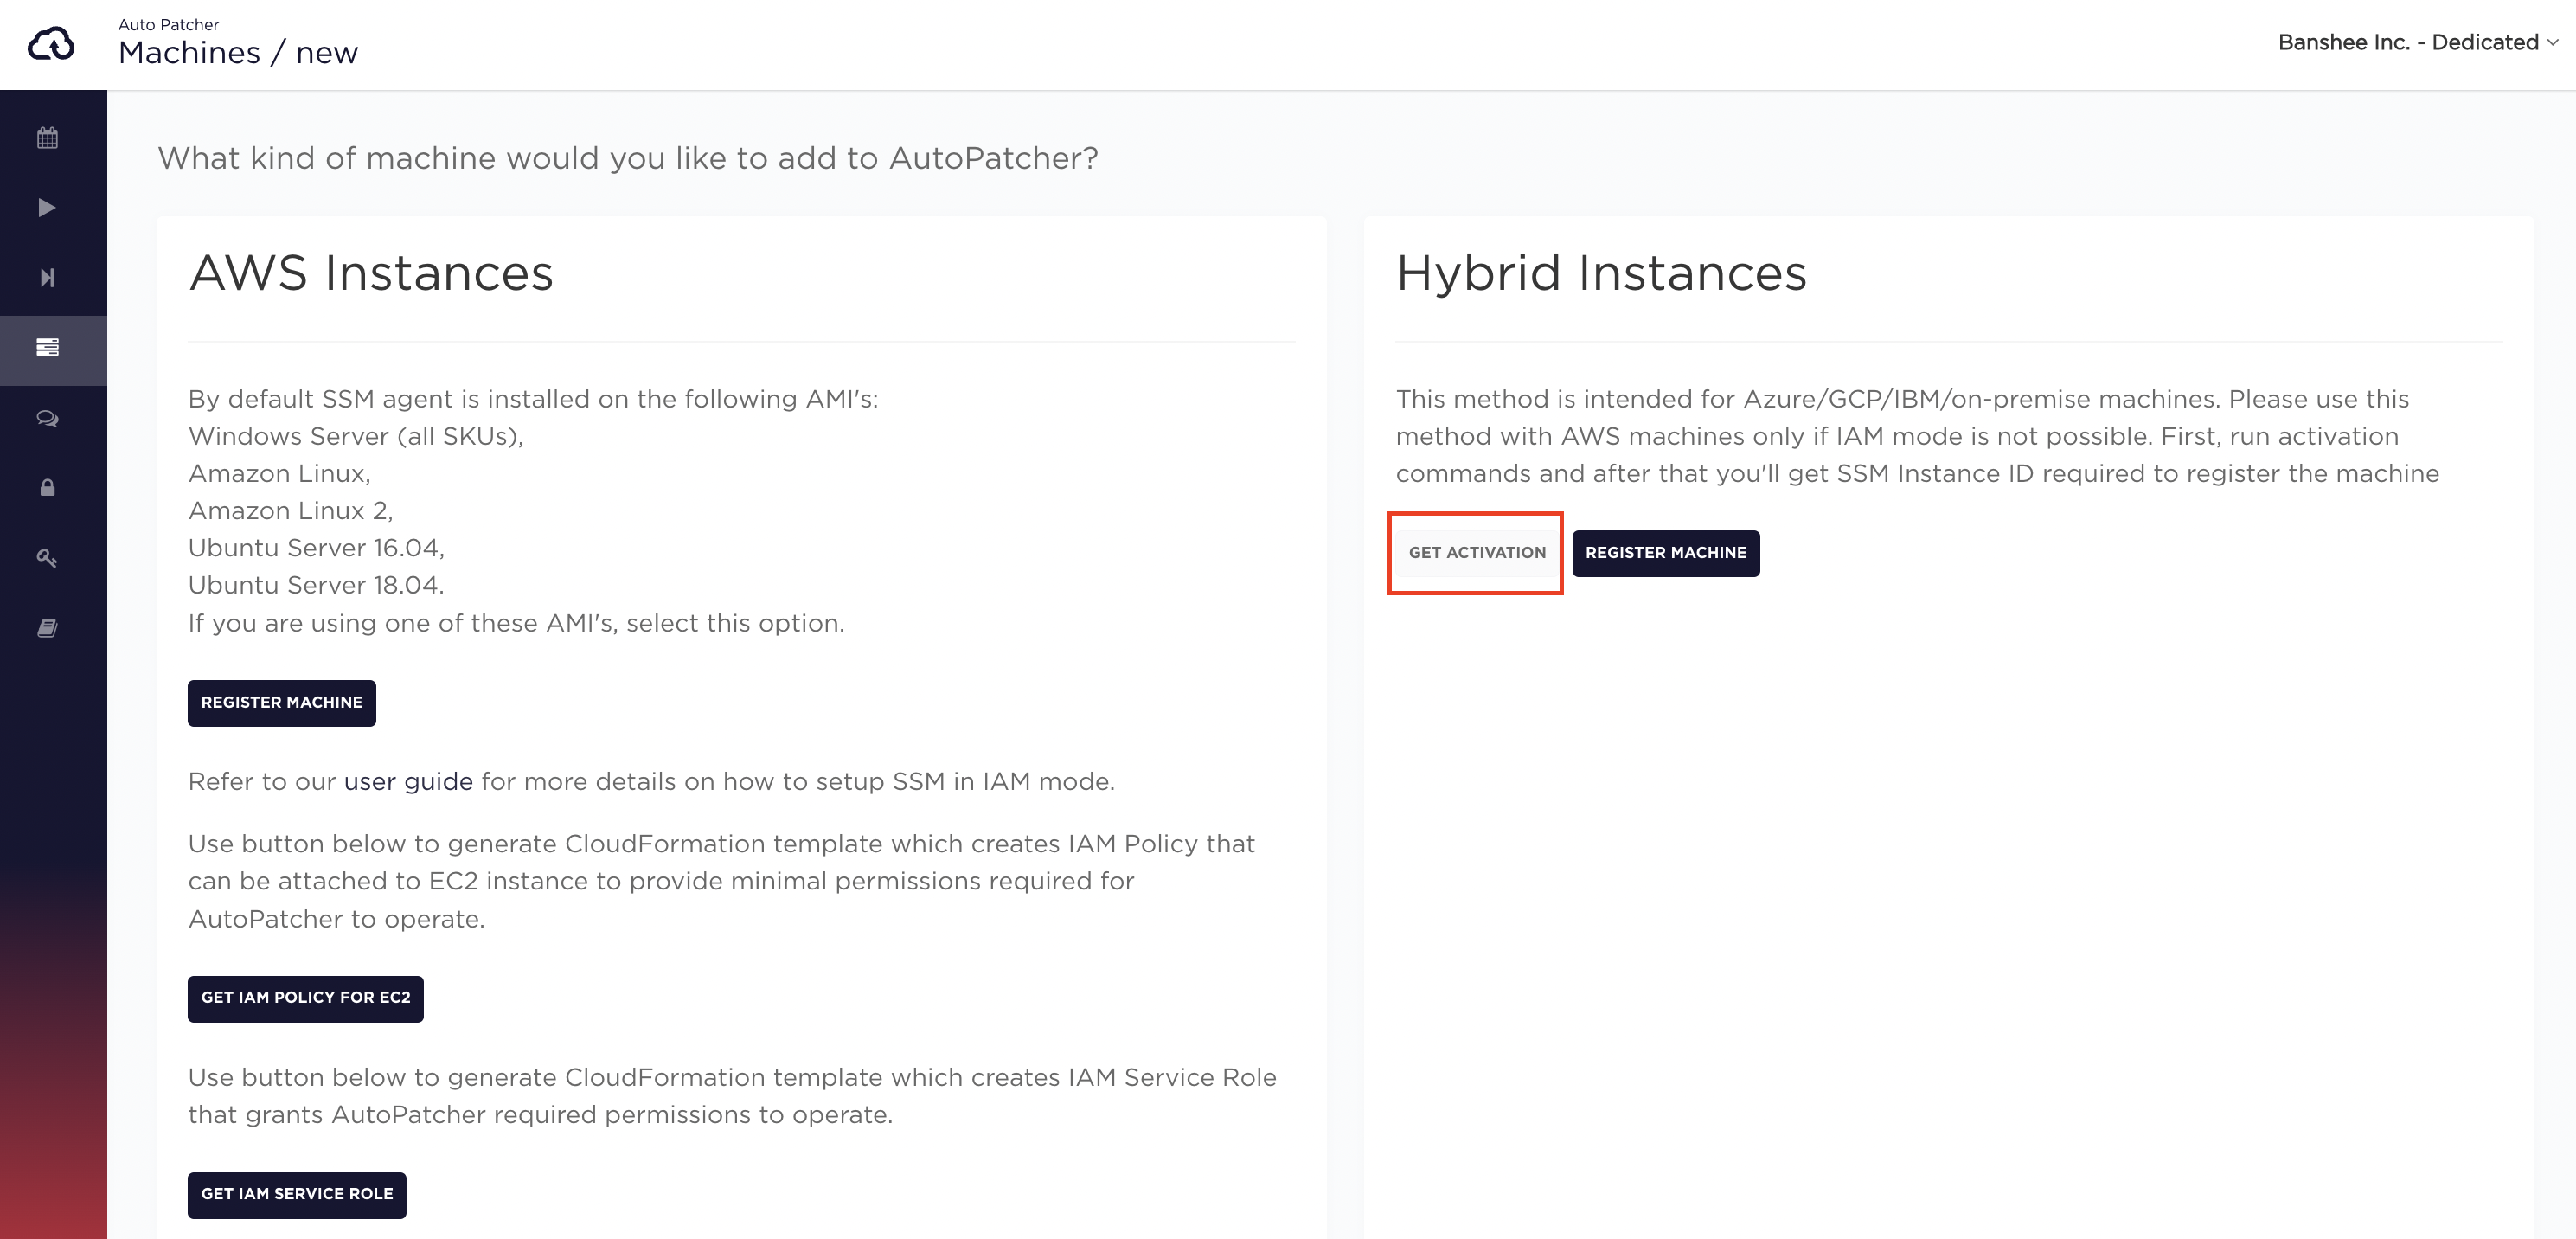
To get current activation id, code and region, go to the New machine page and click the GET ACTIVATION button. If there is no dedicated account for activations available for specified customer, an error will be returned. In that case contact autopatcher@nordcloud.com.

Step 2. Registering the machine
Run the script shown in the appropriate box on the machine you wish register in AutoPatcher.