Scheduling patching plan
AutoPatcher has it's own scheduler implemented. Plan contains a group of machines to update, time window in cron format and additional settings like pre and post hooks.
There are two ways to schedule a patching plan: simple plan and patching pipeline. Both are described below in detail.
Scheduling a simple patching plan
Step 1
In the User interface select from left navigation bar go to Plans > New Plan
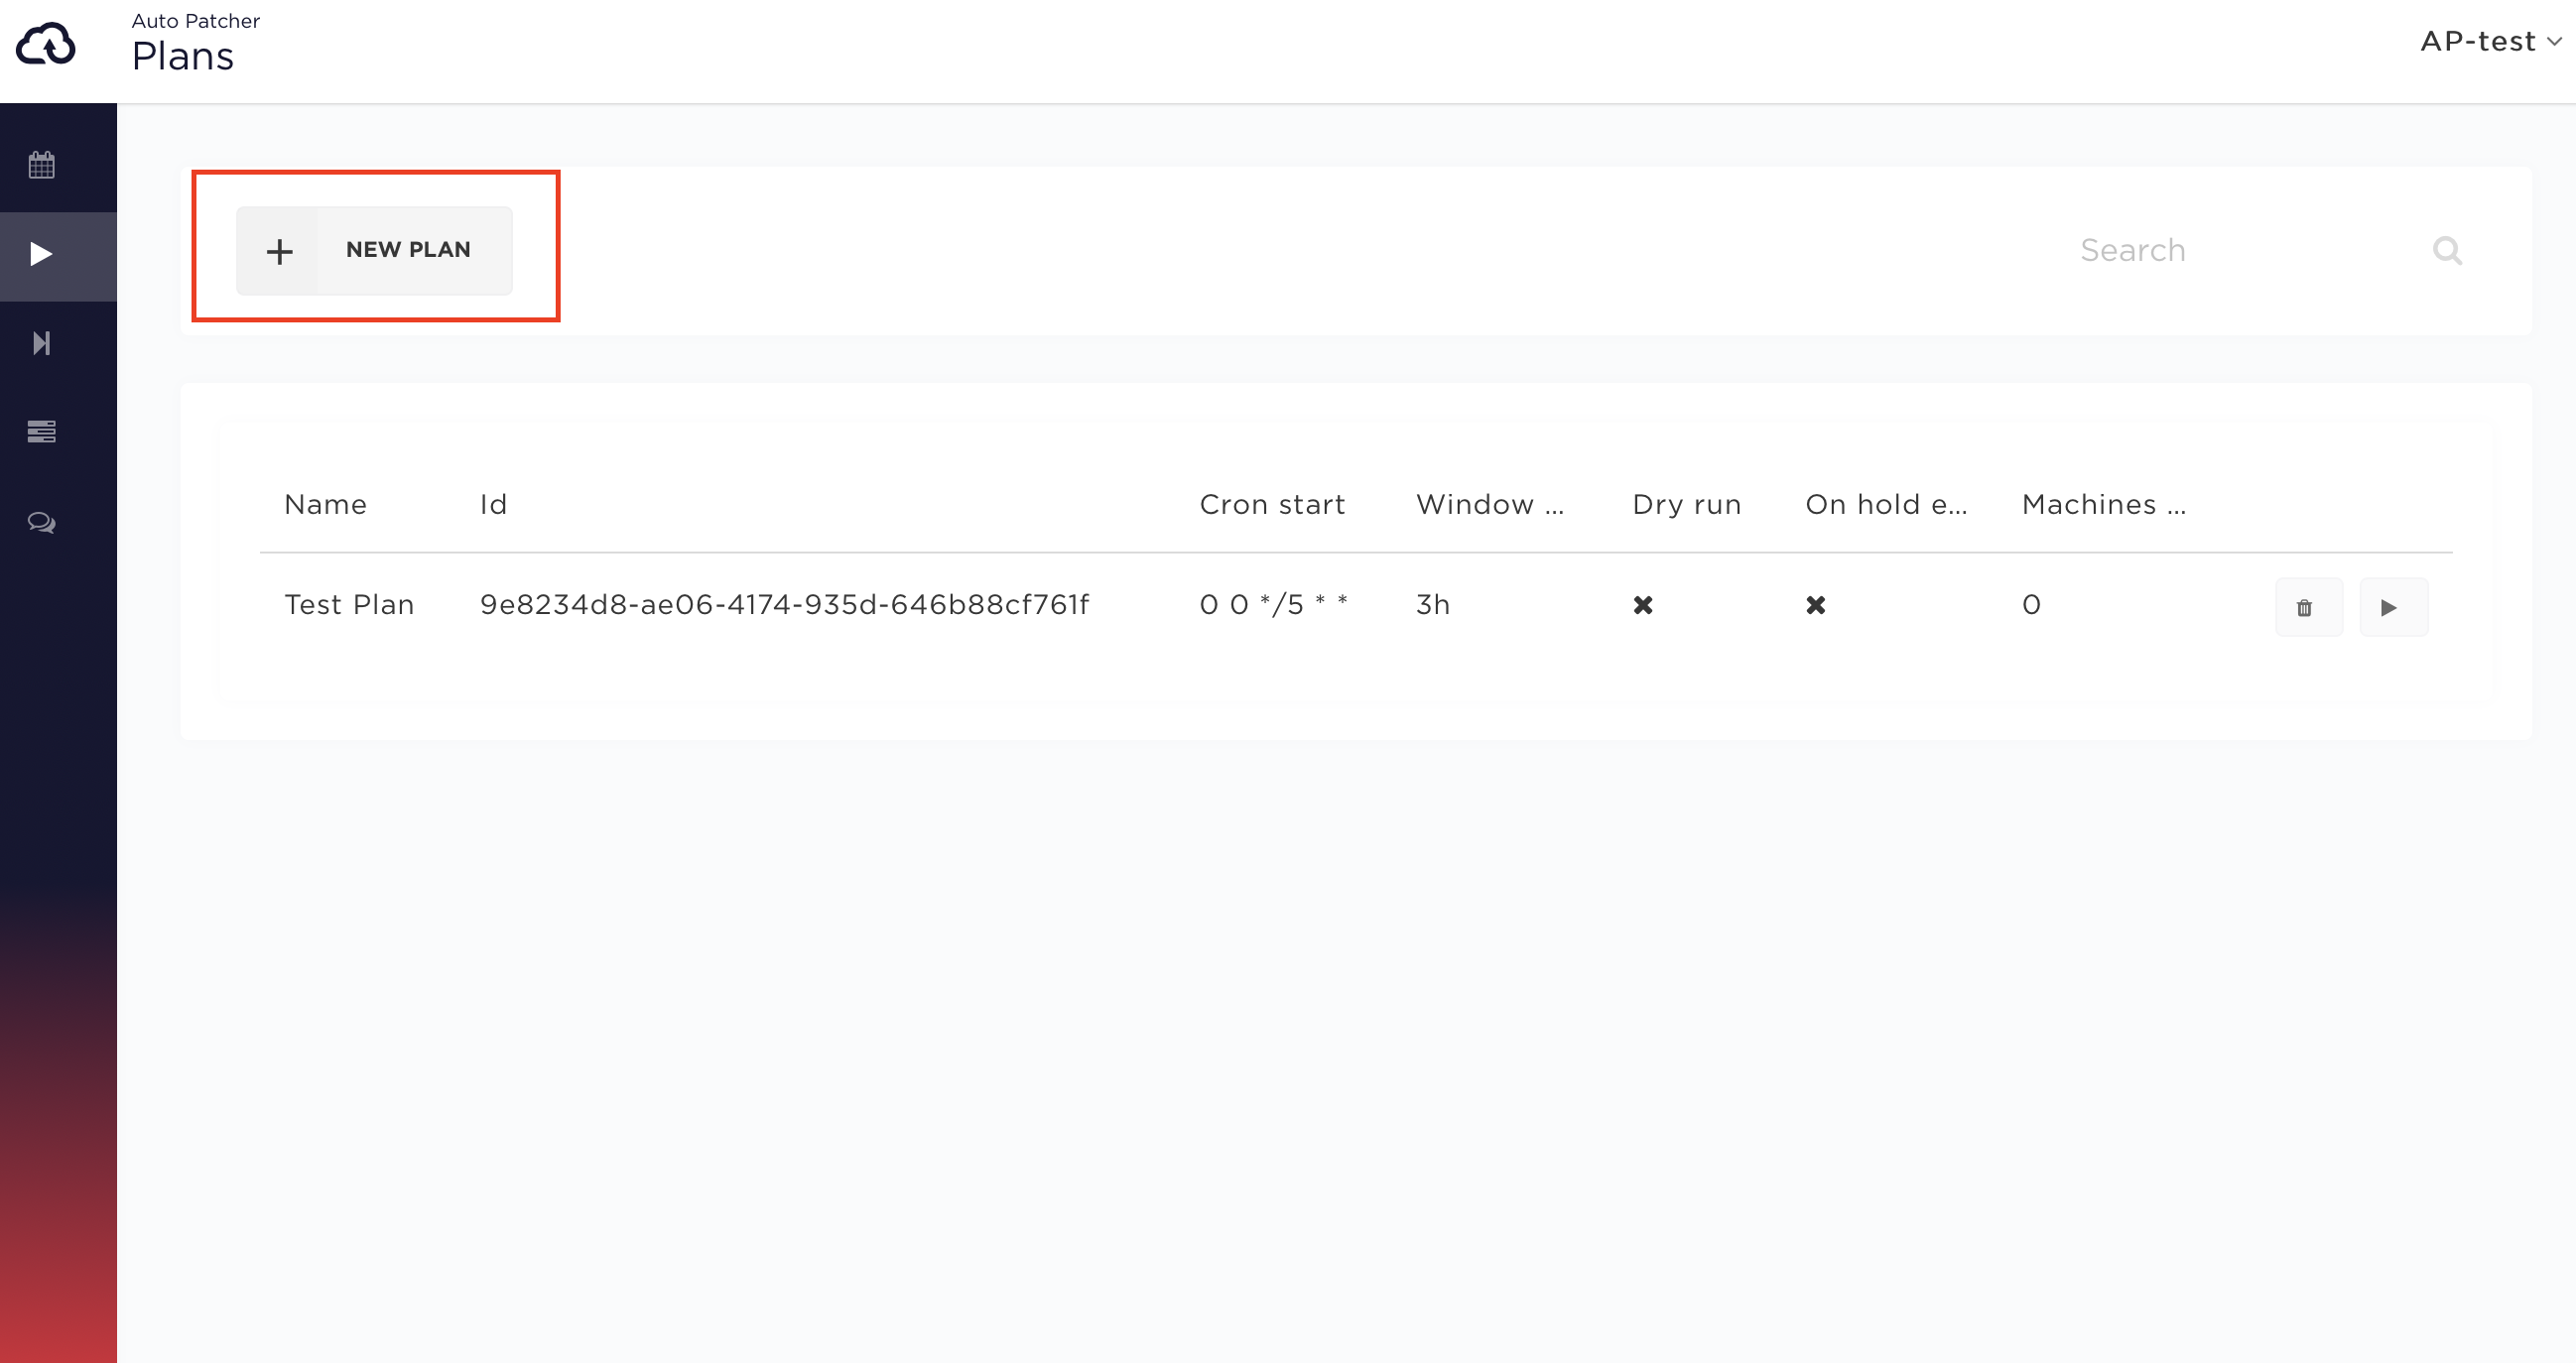
Step 2
Step 2.1
Choose the plan name
Step 2.2
Specify the time and frequency of plan execution via cron schedule using one of the two ways described below.
Please note that all dates/times in AutoPatcher are in UTC
Graphical cron editor
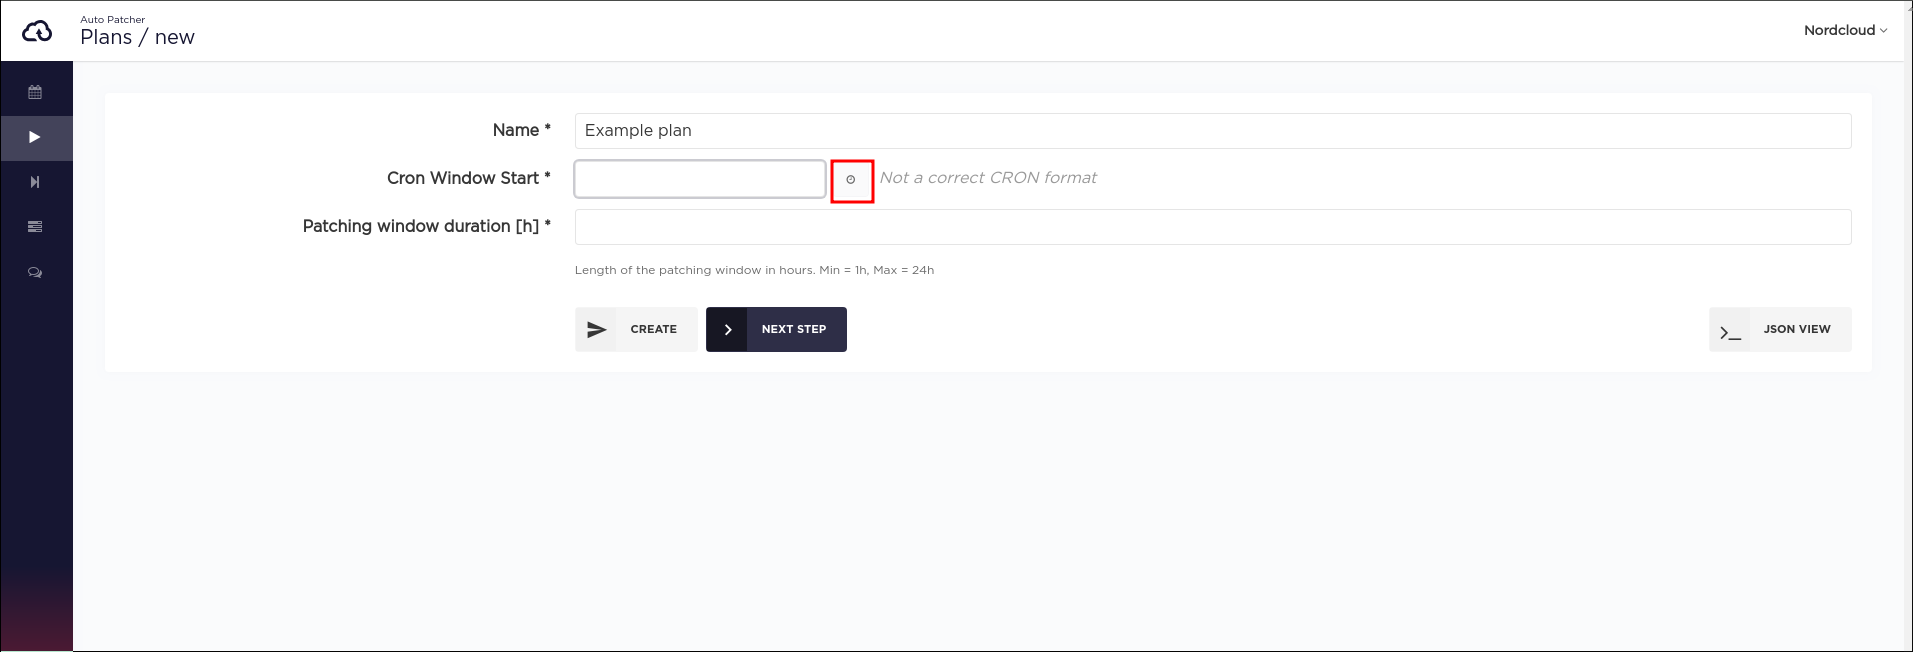
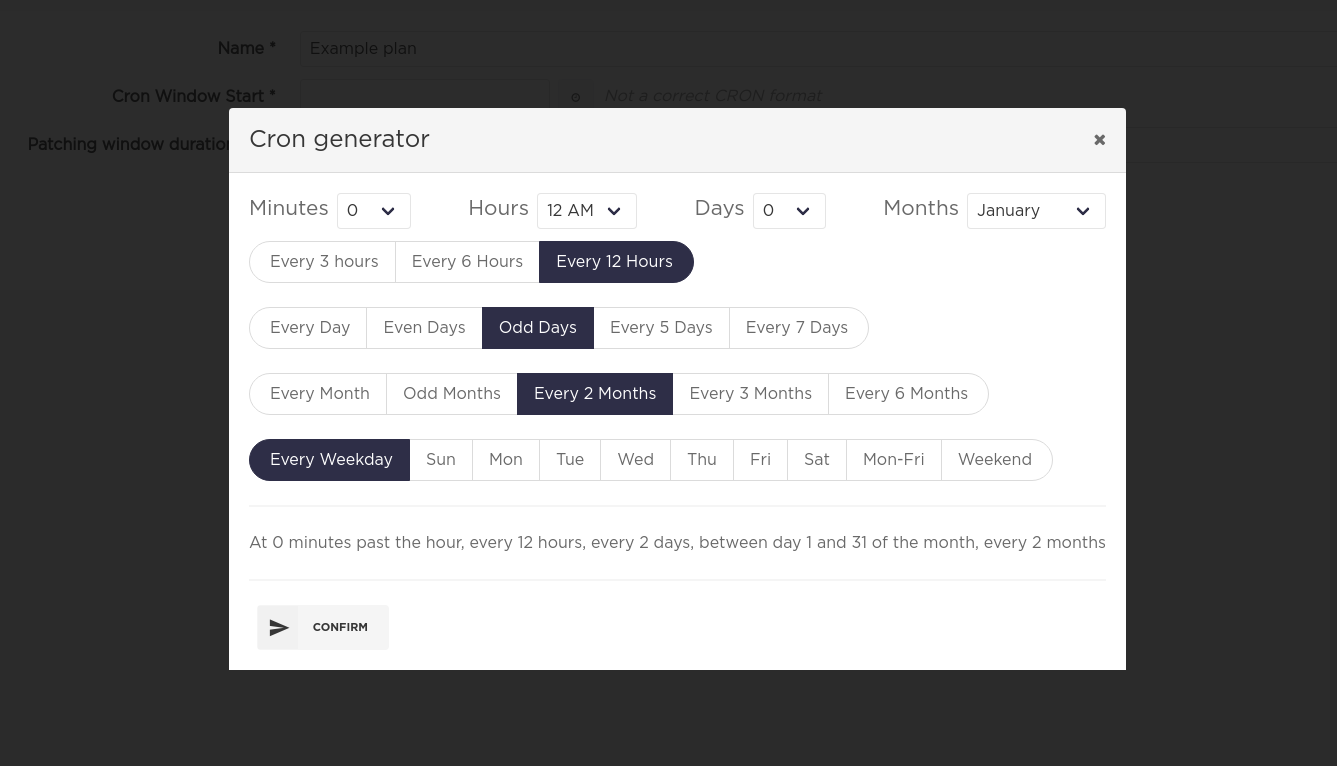
Manually enter cron schedule

Step 2.3
Specify patching window length in hours
Step 3
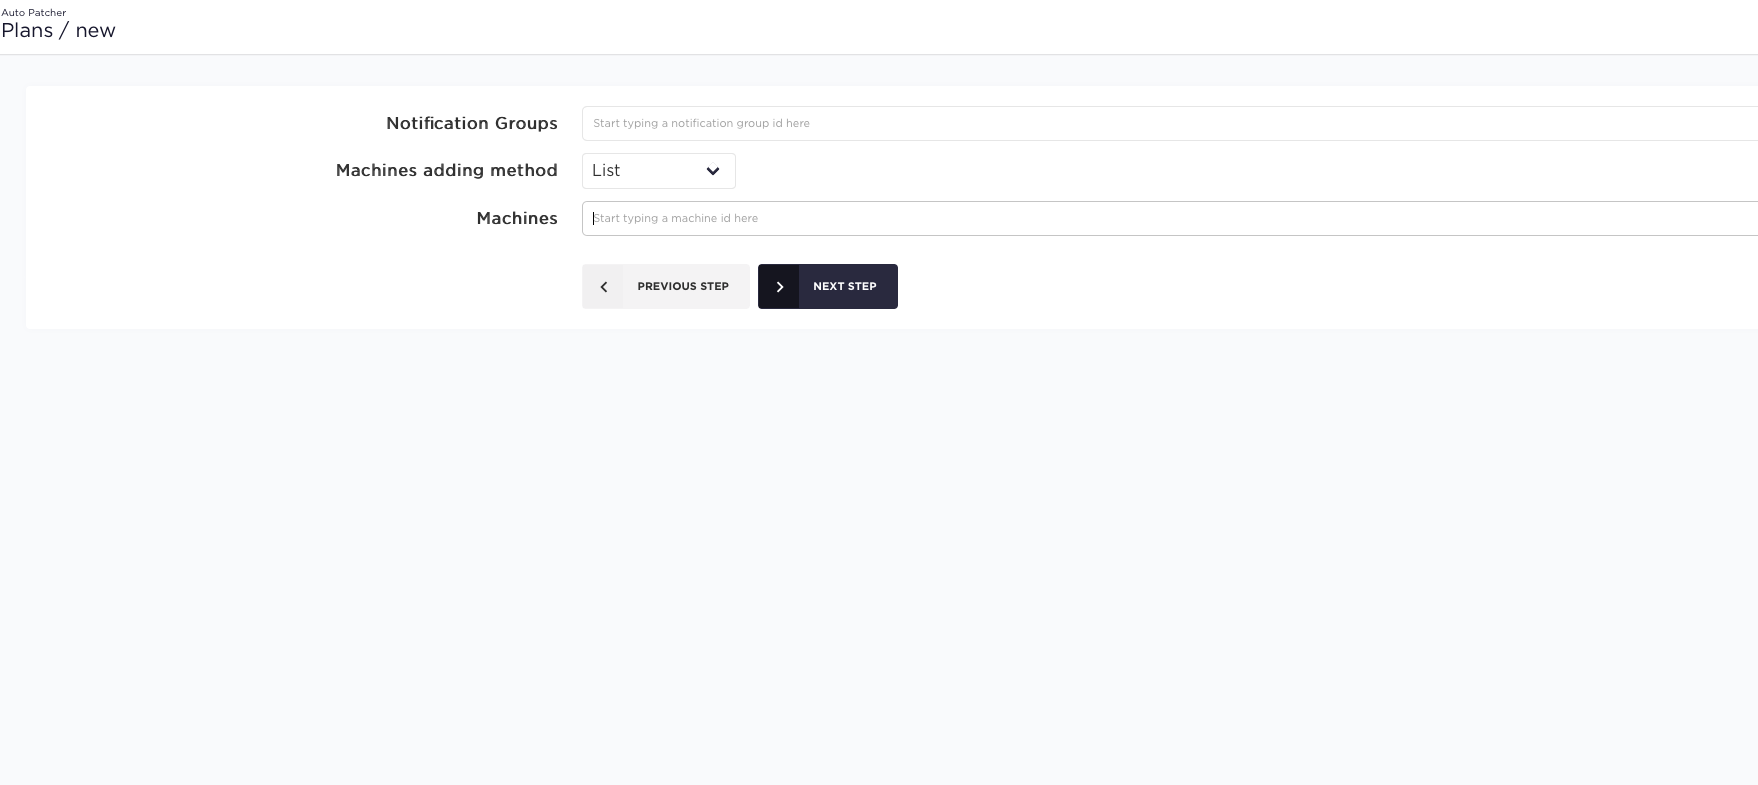
In this step two plan properties can be specified:
- Notification group(s) which allow to receive various patching related information. Read more.
- Machines to be patched in the plan. Based on the Machine adding method there are two types of plans: standard and dynamic, both of which are described below in detail.
Step 3.1 (standard plan)
Choose List machine adding method. A Machines field will appear where you can start typing a name or an id of some previously added machine (read more) to add it to the plan.
Machine related properties
After the machine is selected some properties related to it can be changed:
- Patching order of the machine in regard to other machines in the plan.
- Pre/Post host hooks which allow to perform custom actions before/after this machine is patched (read more).
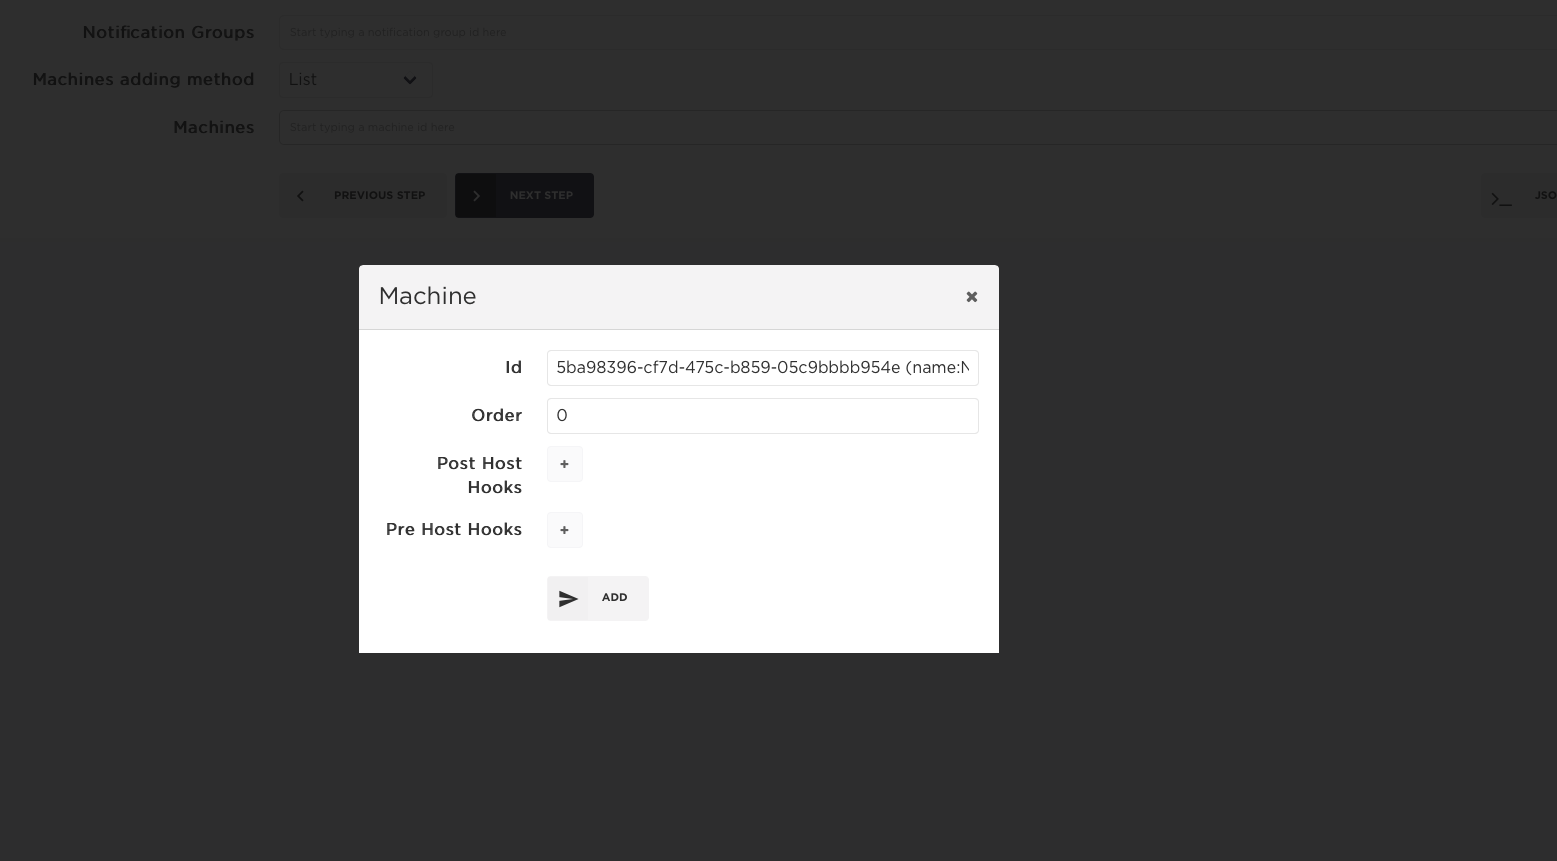
Later these properties can be changed by clicking on the corresponding edit button:
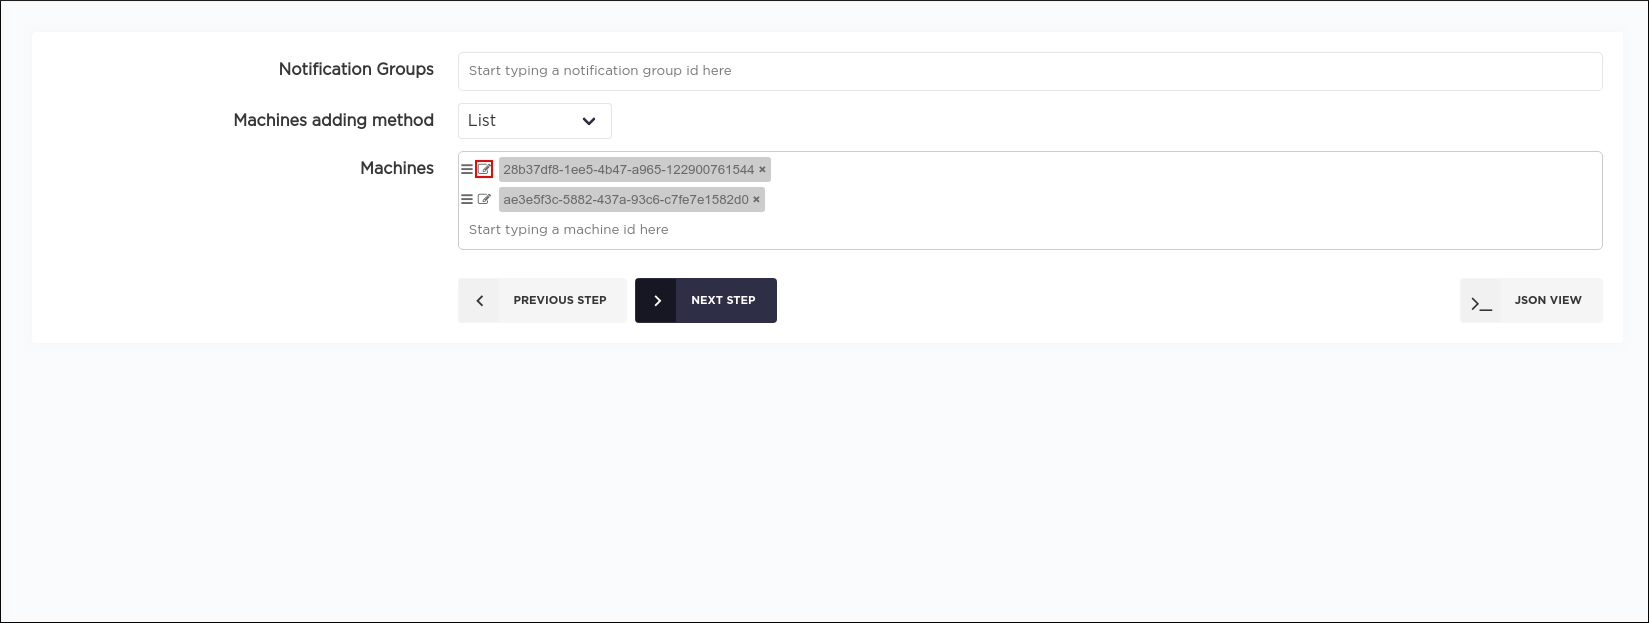
Step 3.2 (dynamic plan)
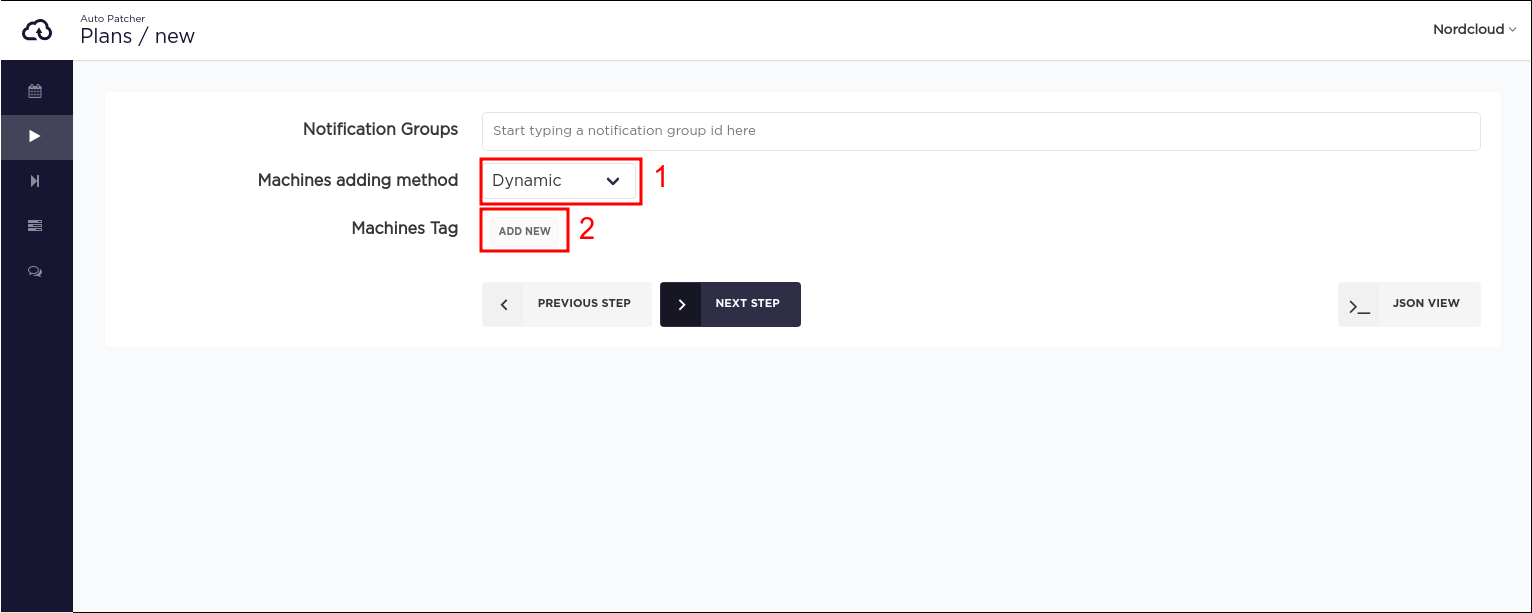
Choose Dynamic machine adding method and click the ADD NEW button.
Here the following information can be provided:
Tag list[required]: AWS EC2 tags of the machines that should be patched when this plan executes. Multiple tag keys can be provided, and for each tag key, multiple tag values can be specified.IAM Role[required]: An IAM role, which will be used by AutoPatcher to scan the machines based on provided tags.Regions(optional): A list of regions in which to scan for machines. By default, all available regions are included, some of them can be manually removed from the list.Allow reboot(optional): Read more.Pre host hooks(optional): Read more.Post host hooks(optional): Read more.Update existing(optional): described in the dynamic machines section.Include stopped(optional): If set to true then stopped/stopping EC2 instances will be added to a plan.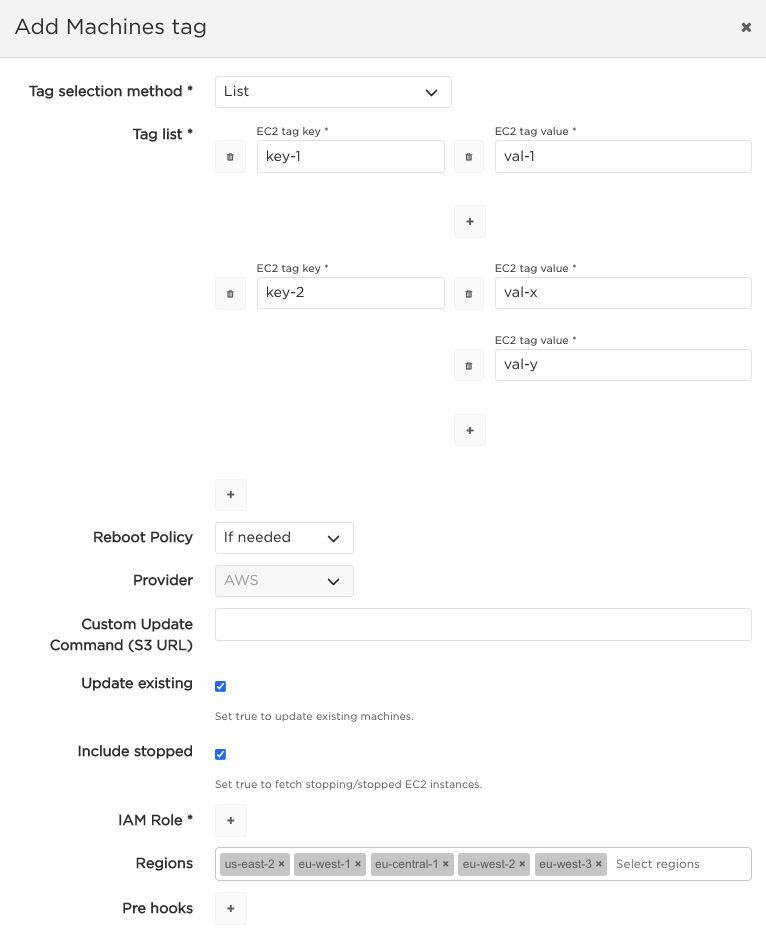
After the confirmation this information still can be changed by clicking at the tag name(s) near the Machines Tag label.
Scanning EC2 instances by tags
Please note that when the dynamic plan has multiple key-value pairs specified in the Tag list field, AutoPatcher
scans for each of them separately and then combines all the found machines in a single list.
In other words, it uses an implicit OR logical operator for joining the tag conditions.
Example:
If the AWS account has the following EC2 instances:
| Name | Tags |
|---|---|
| machine-1 | autopatcher-enable = true patching-stage = dev-1 |
| machine-2 | autopatcher-enable = true patching-stage = dev-2 |
| machine-3 | autopatcher-enable = true |
| machine-4 | patching-stage = dev-1 |
| machine-5 | patching-stage = dev-2 |
| machine-6 | patching-stage = QA |
| machine-7 | patching-stage = Production autopatcher-enable = true |
| machine-8 | patching-stage = Production |
and the tag list in the dynamic plan is defined in the following way:
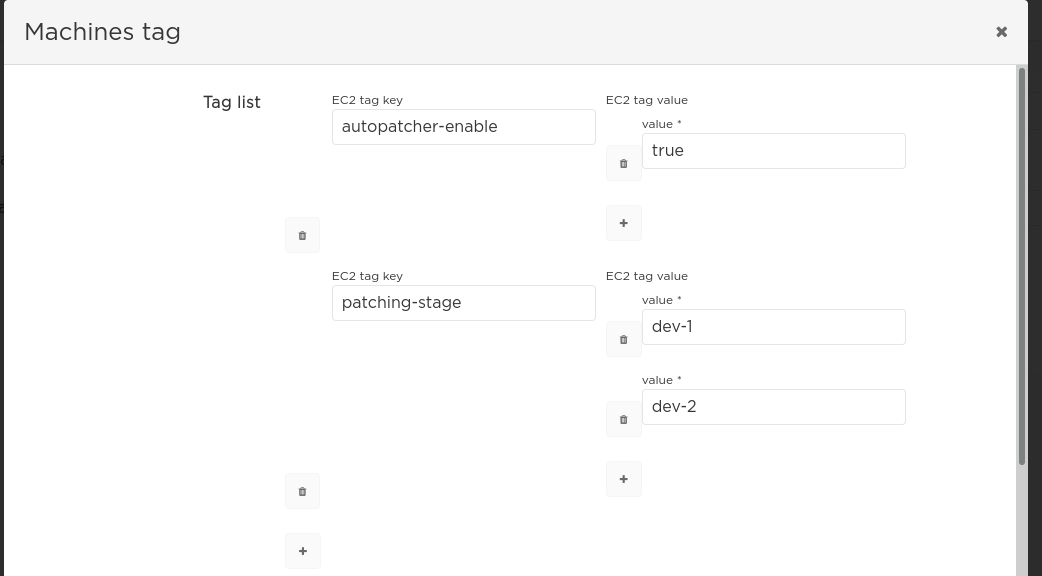
AutoPatcher will include in the plan and patch the following machines:
machine-1machine-2machine-3machine-4machine-5machine-7
Please visit the Defining a dynamic plan section on the Command line interface page
for the detailed instructions on how to define a dynamic plan using more advanced mechanism of logical expressions
to overcome this limitation.
Dynamic machines
Each time a dynamic plan is executed AutoPatcher scans for machines based on provided tags. All discovered machines are then added to the AutoPatcher database and can be seen on the machine list view marked as DYNAMIC:
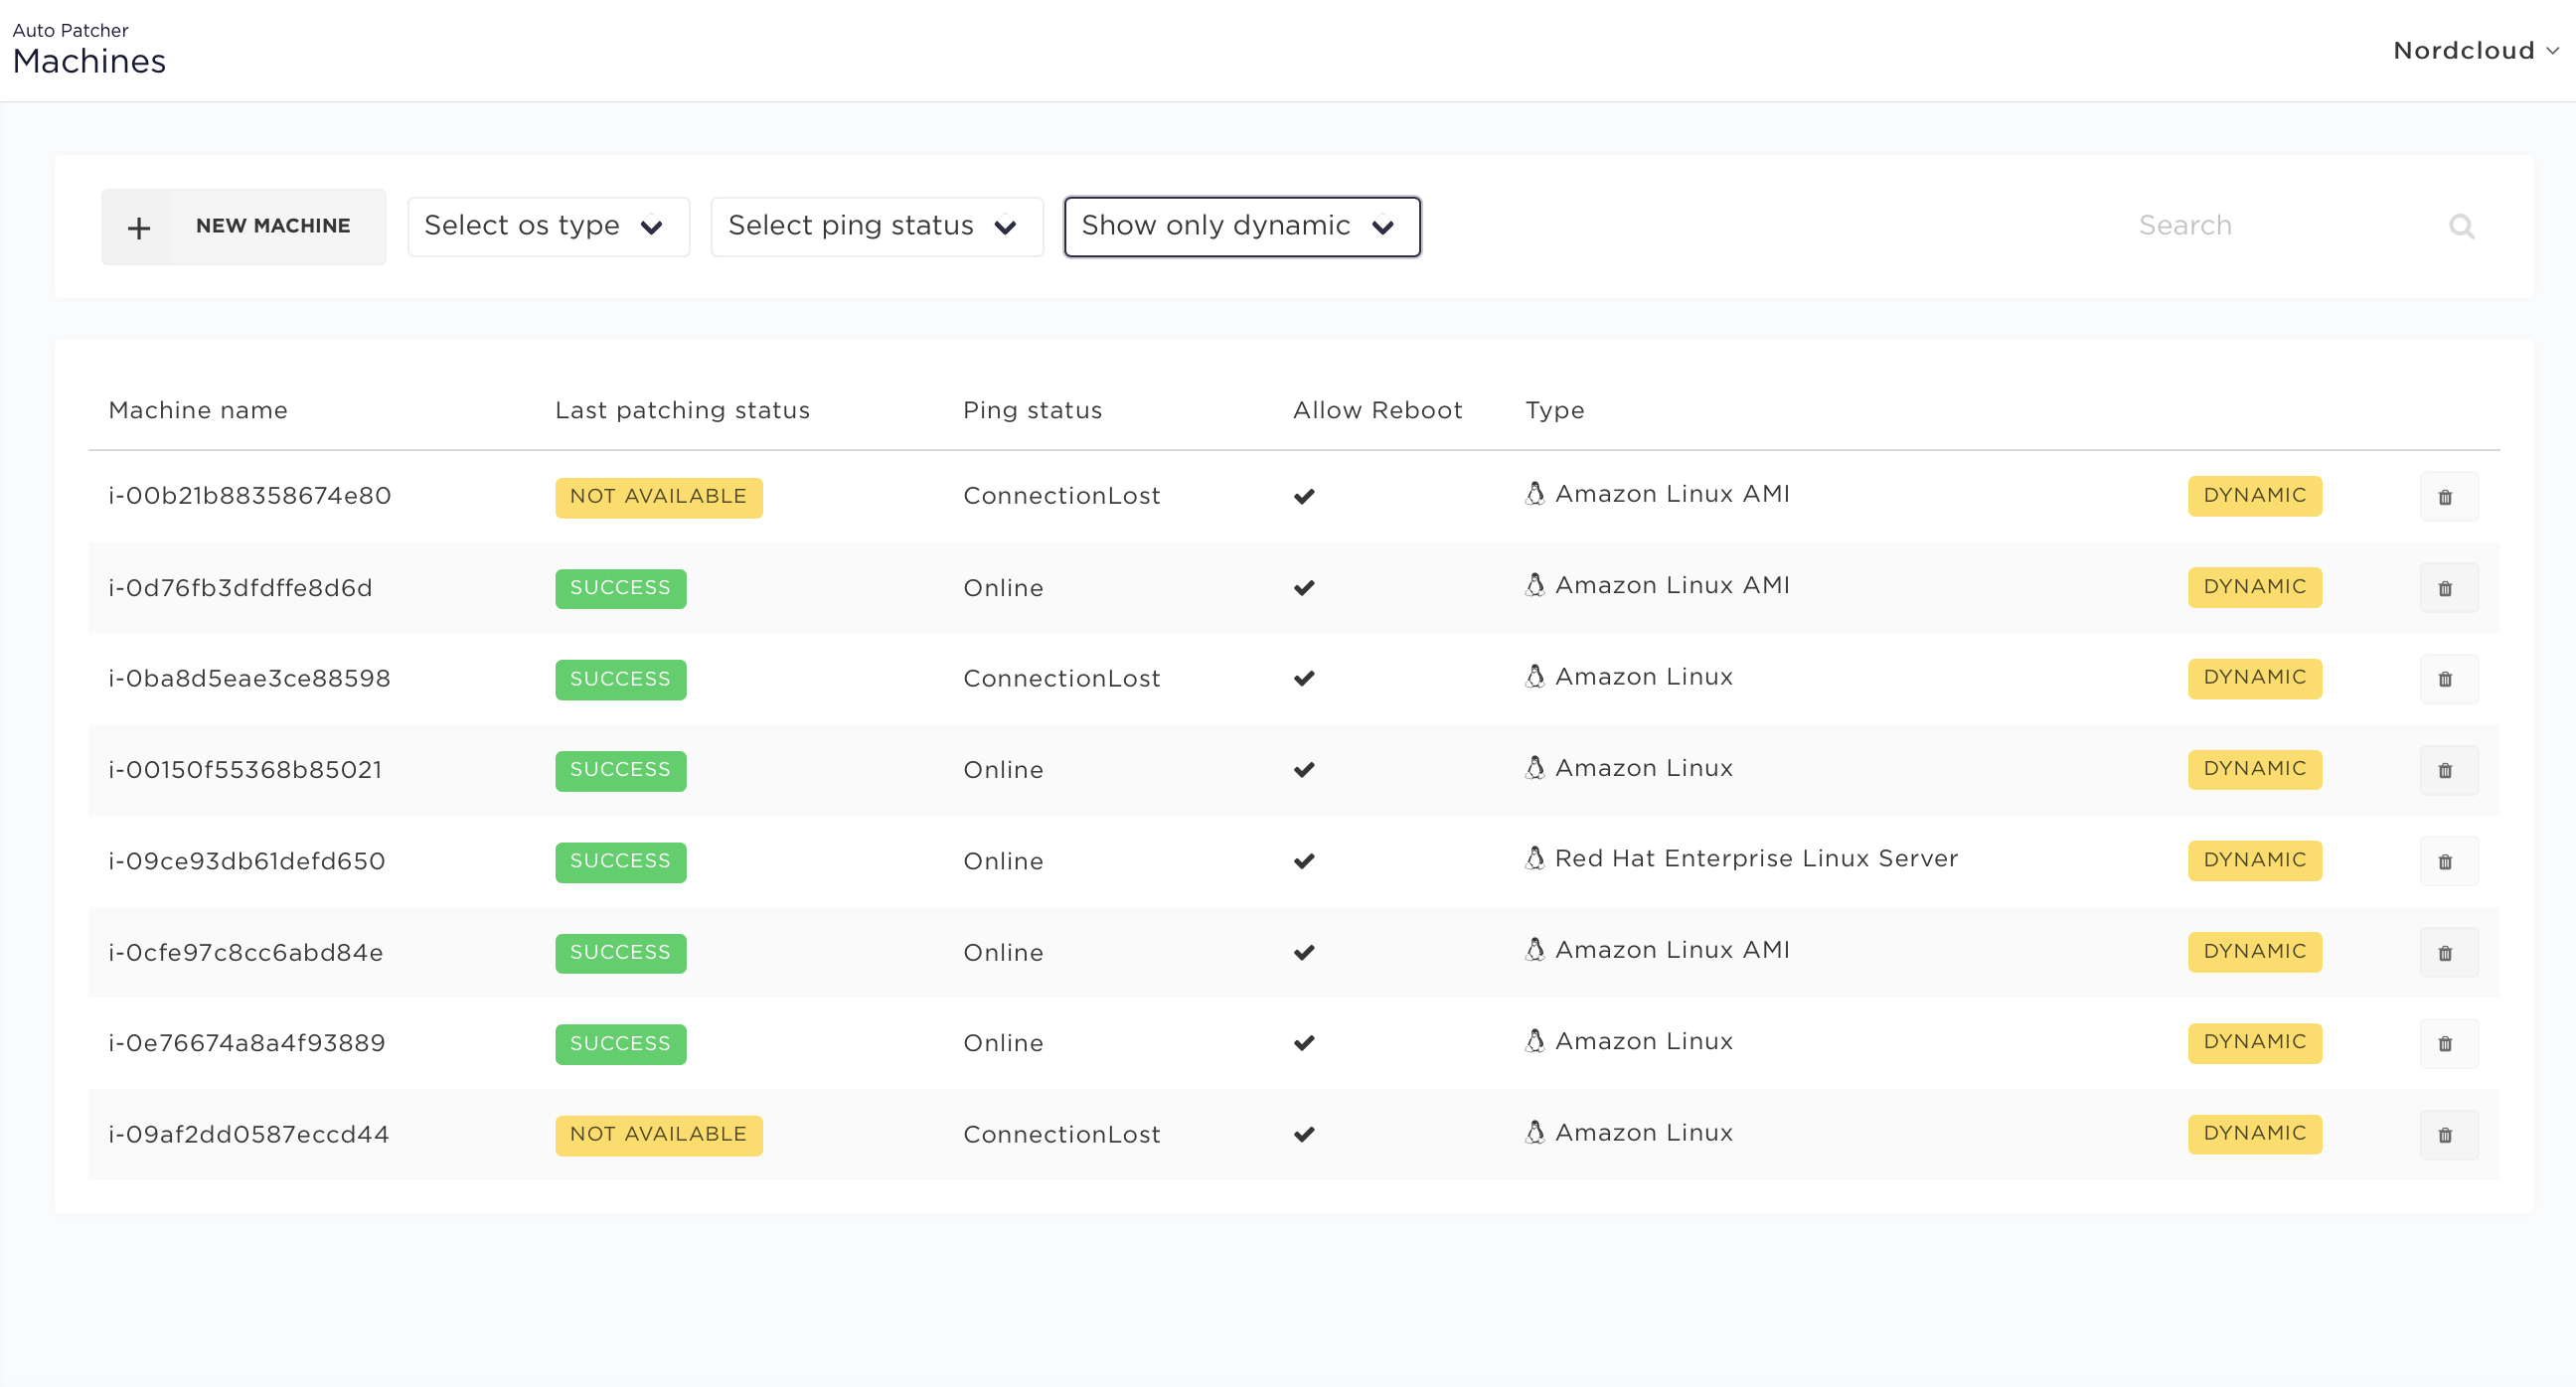
If the dynamic machine already exists in AutoPatcher (e.g. it was added by previous execution of the same dynamic plan) its properties can be synchronized with new ones which were retrieved from EC2. If Update existing checkbox was selected, the machine in AutoPatcher will be updated, otherwise it won't be changed.
Step 4
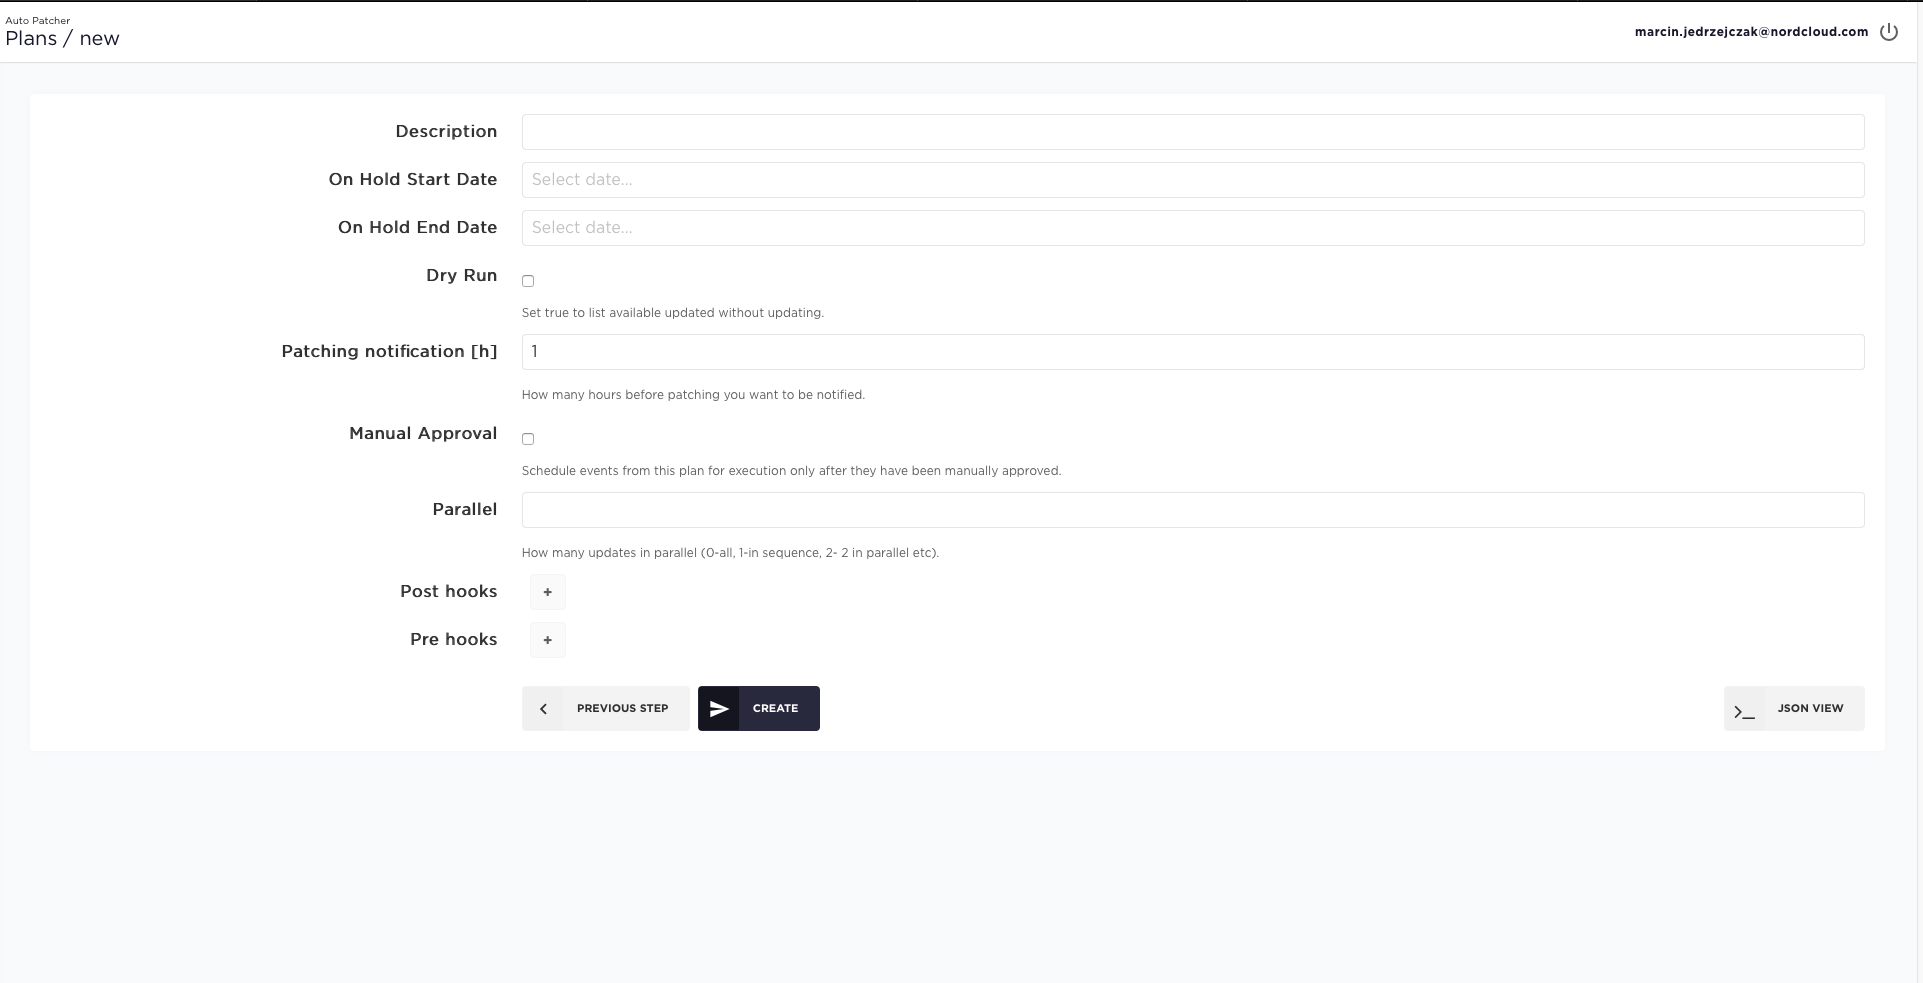
In this step you can:
- add On hold start/end date (period of time when patching shouldn't happen)
- select dry run (execute plan without updating machines and list available patches instead. This can be useful for testing Auto patcher. This option is available for Windows and Linux machines. By default this option is switched off.
- select manual approval - patching events from this plan will require to be manually approved before patching (events which were approved after their time window had ended are NOT going to be executed)
- specify a number of machines to be patched in parallel
- add pre and post hooks
Scheduling a patching pipeline
AutoPatcher has it's own patching pipeline scheduler. Whenever you want to schedule multiple patching plans with dependencies between them you can use a patching pipeline.
How to configure a patching pipeline
Patching pipelines description
A patching pipeline allows to schedule multiple plans with dependencies between them. Pipelines are divided into steps, each of which consists of one or more patching plans. All plans that belong to a step are executed in parallel and the step window length is considered as the window length of the longest plan of that step. Patching events are generated for each step separately. The step is considered finished once all the events of plans belonging to it are finished. Following steps can be executed once previous steps were finished, depending on policy defined for the step.
Patching pipelines are designed to allow patching for situations where different sets of machines are to be patched on different times, but in some relation to each other, e.g. when an application consists of different environments. A simple example would be an application which consists of a development environment, a staging or preproduction environment and a production or live environment. A patching pipeline will allow to automate a process in which staging will be a week after the development environment was patched, if that patching was successfull, and then patch the live environment after another week, but only if a user confirmed that everything was patched successfully and the application works properly on the staging environment.
Additionally, patching pipelines have the possibility to ensure that a patching baseline is followed for different environments. For more information check baseline patching.
Pipeline properties description
Cron window start
The Cron window start property applies to the first step in the pipeline, more precisely to all plans within the first step, and determines when the whole pipeline will start. This Cron expression has the same meaning as for simple plans.
Step delay (2nd and following steps only)
All steps after the first have step delay property (in minutes) which means how much time should pass between the moment all the events from the preceding steps are finished and the moment all the plans from the following step are started.
There is no maximum patch delay. You can set it for example to 72h if you want to execute next plan 3 days later.
Patching policy (2nd and following steps only)
Patching policy property allows to specify the behavior of the next step based on the status of the previous step.
| Policy | Description |
|---|---|
Success or approval | If all events for plans from the previous step succeeded, the next one is executed automatically. Otherwise, manual approval is required for the next step to be executed. |
Approval required | Regardless of the status of the previous step the next step requires manual approval to be executed. |
Patch anyway | Regardless of the status of the previous step the next step is executed automatically. |
How to approve events
Run immediately (2nd and following steps only)
Normally any step excluding the first starts executing step delay minutes after the previous step window ends. If the step has the run immediately property set to true, it is executed immediately (within 5 minutes) after the last plan of the previous step has actually ended (all the plans could end earlier than their specified time window indicates), but with the condition that the patching policy allows it. If the next step requires manual approval, it is executed immediately after it is approved.
Advanced features
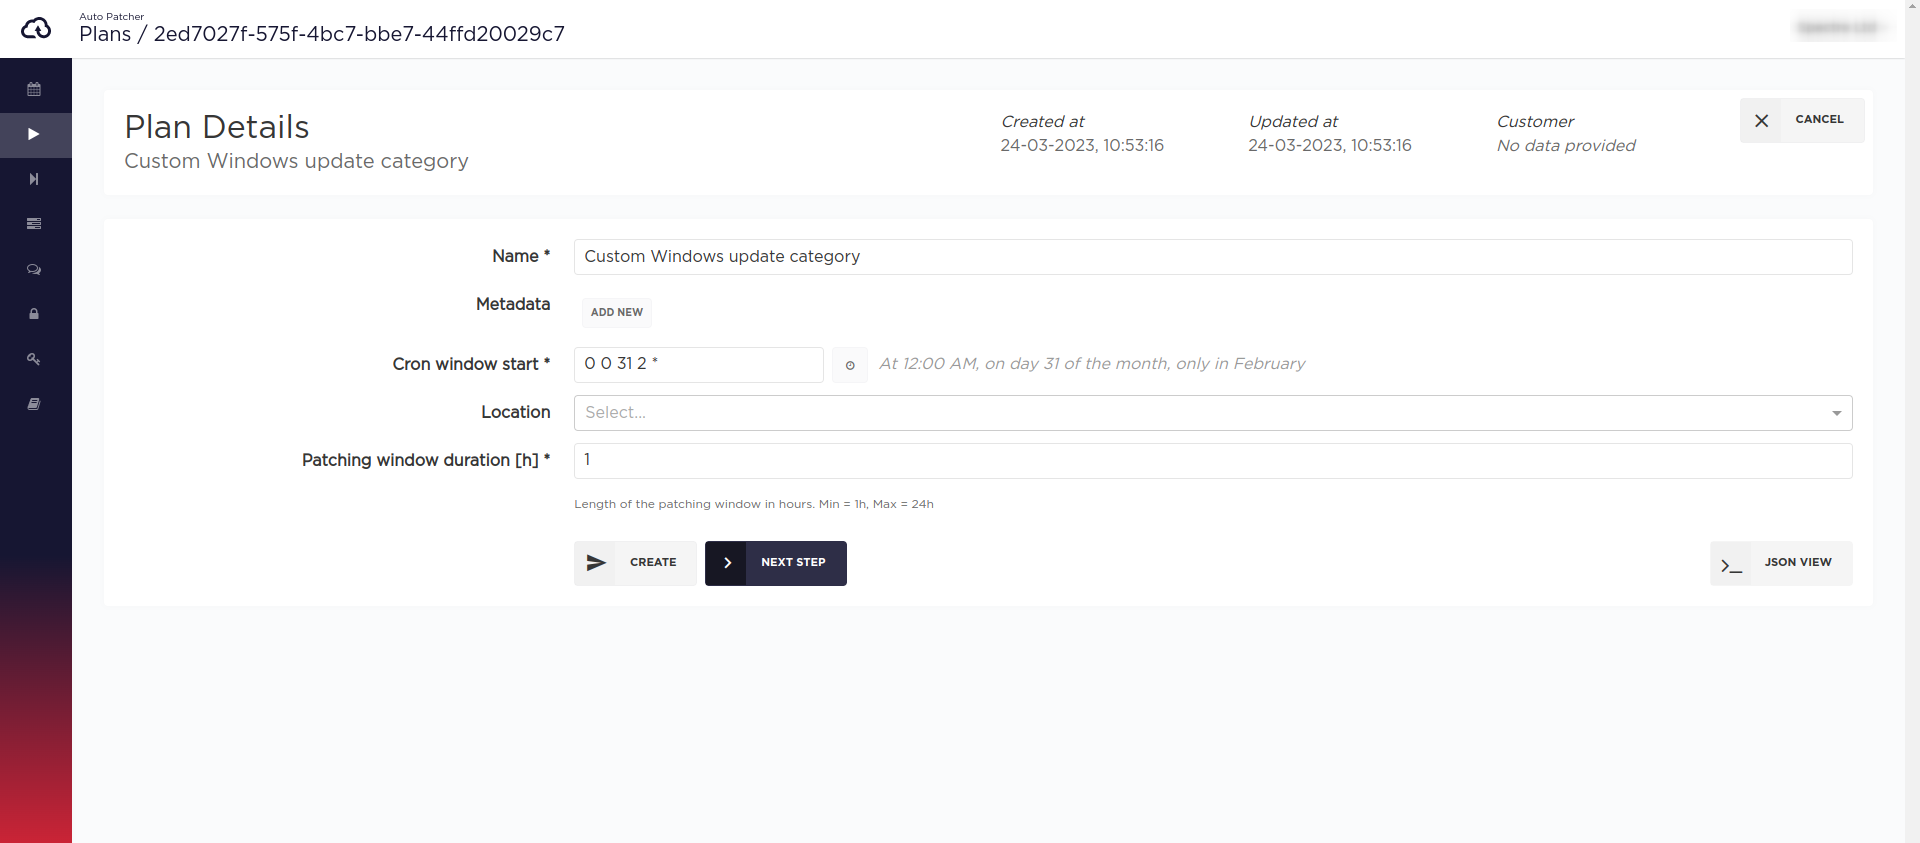
Specifying Windows update category/severity
Since AutoPatcher version 1.130 there is an ability to specify the Update categories and Severity levels for
Windows machines on a plan level (works for pipelines as well).
Allowed values
The available update categories are:
ApplicationConnectorsCriticalUpdatesDefinitionUpdatesDeveloperKitsDriversFeaturePacksGuidanceMicrosoftSecurityUpdatesServicePacksToolsUpdateRollupsUpdates
The available security levels are:
CriticalImportantLowModerateUnspecified
Both categories and severities can be specified as a single value or a comma-separated list (no whitespace is allowed after comma).
Some configuration examples are presented in the following subsections.
Plans
UI
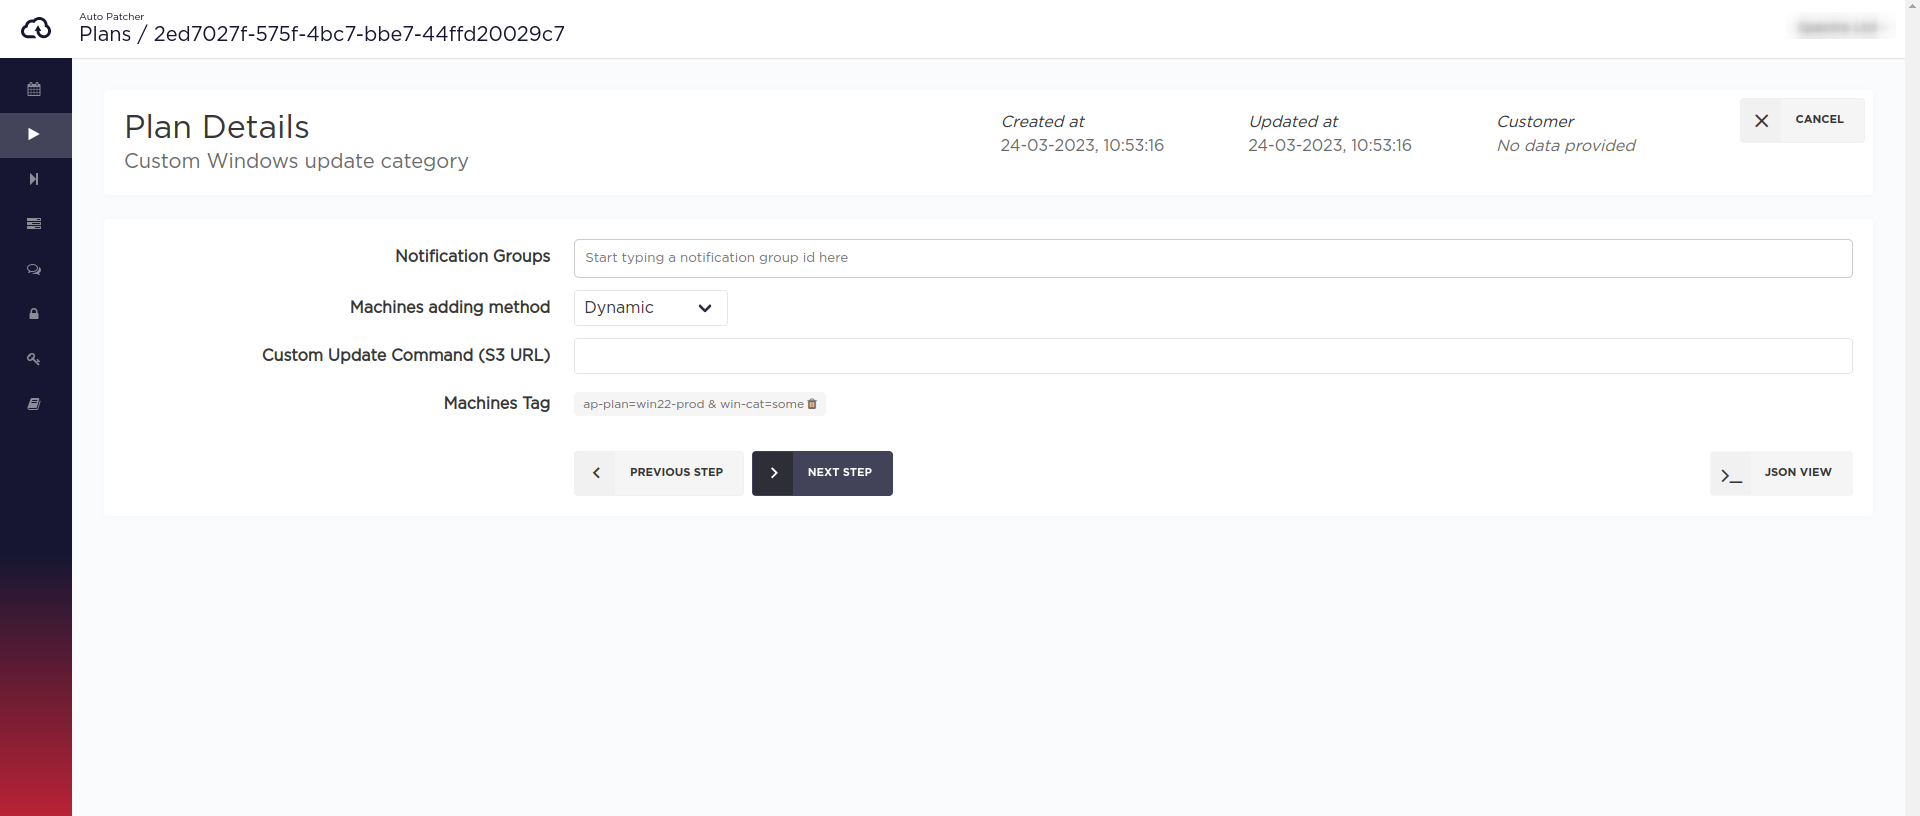
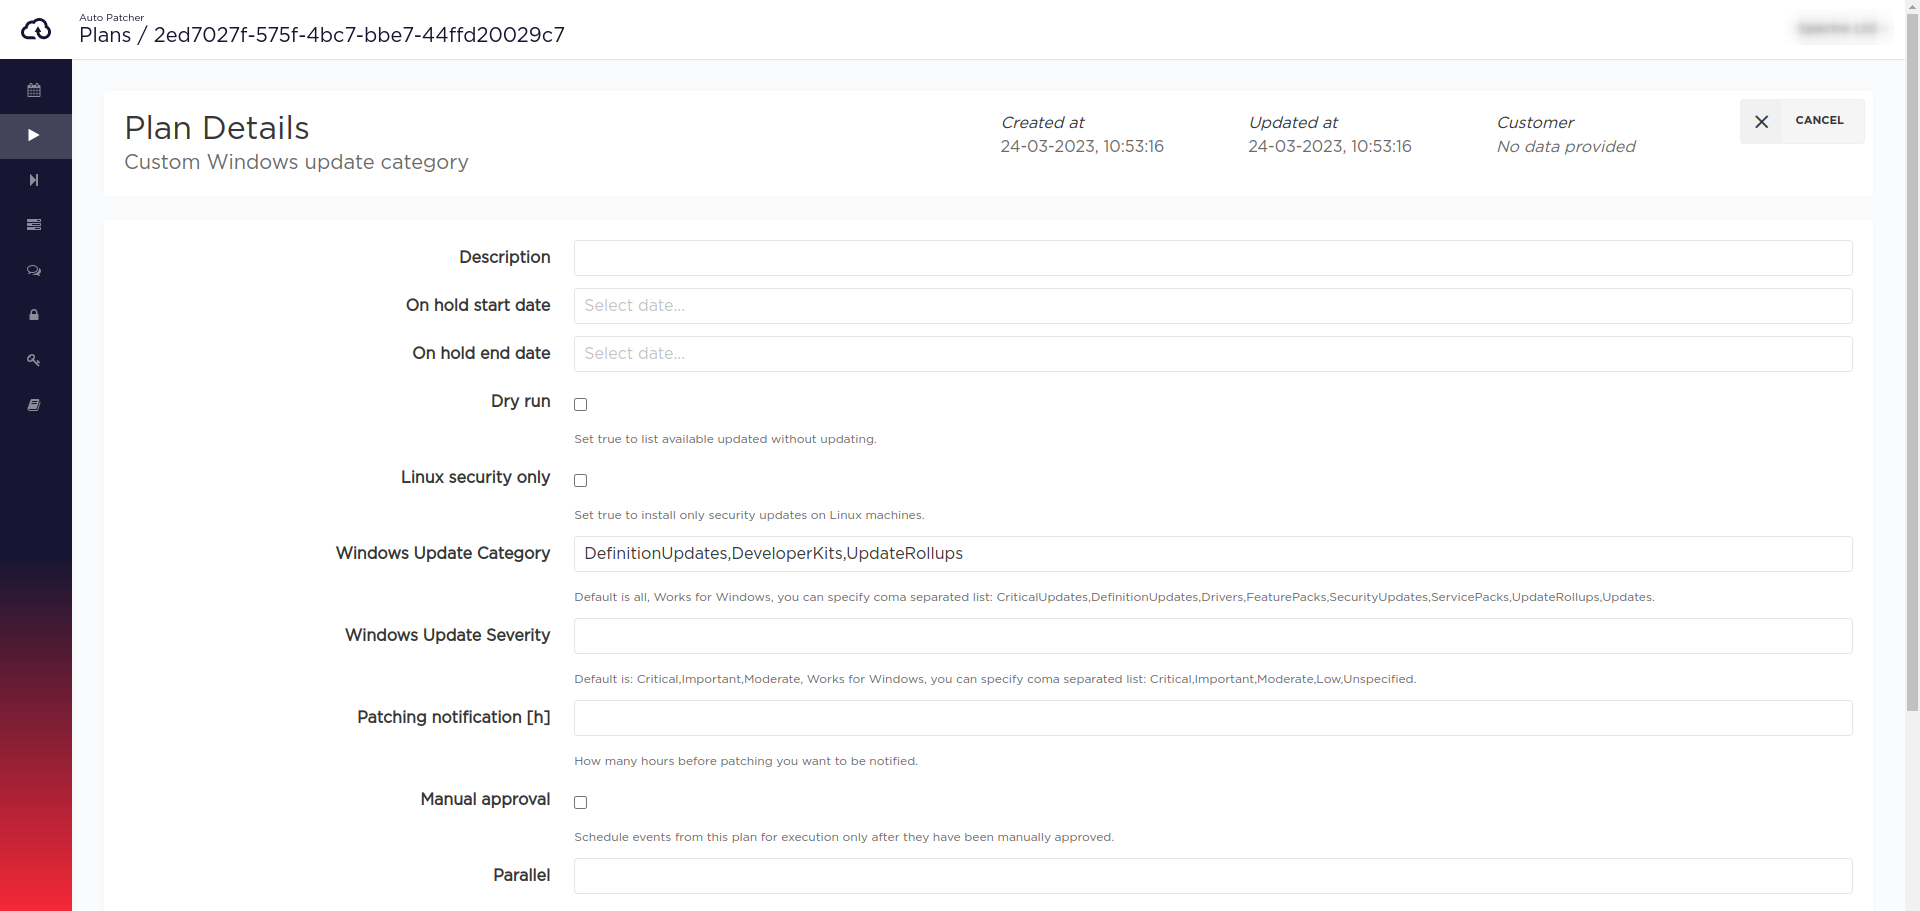
CLI/API
Plan payload:
{"name": "Custom Windows update category","cron_window_start": "0 0 31 2 *","window_length": 1,"machines_tag": {"regions": ["eu-central-1"],"iam_role_list": ["arn:aws:iam::000000000000:role/example-role"],"reboot_policy": "ALWAYS","update_existing": true,"tag_condition": {"expression": "ap-plan=win22-prod & win-cat=some"}},"windows_update_category": "DefinitionUpdates,DeveloperKits,UpdateRollups"}
To create this plan in CLI save the payload into the file named plan.json and run the following command:
nc-autopatcher-cli create plan --file plan.json
Pipelines
NOTE: the windows_update_category and windows_update_severity does not have any effect in baseline pipelines!
UI
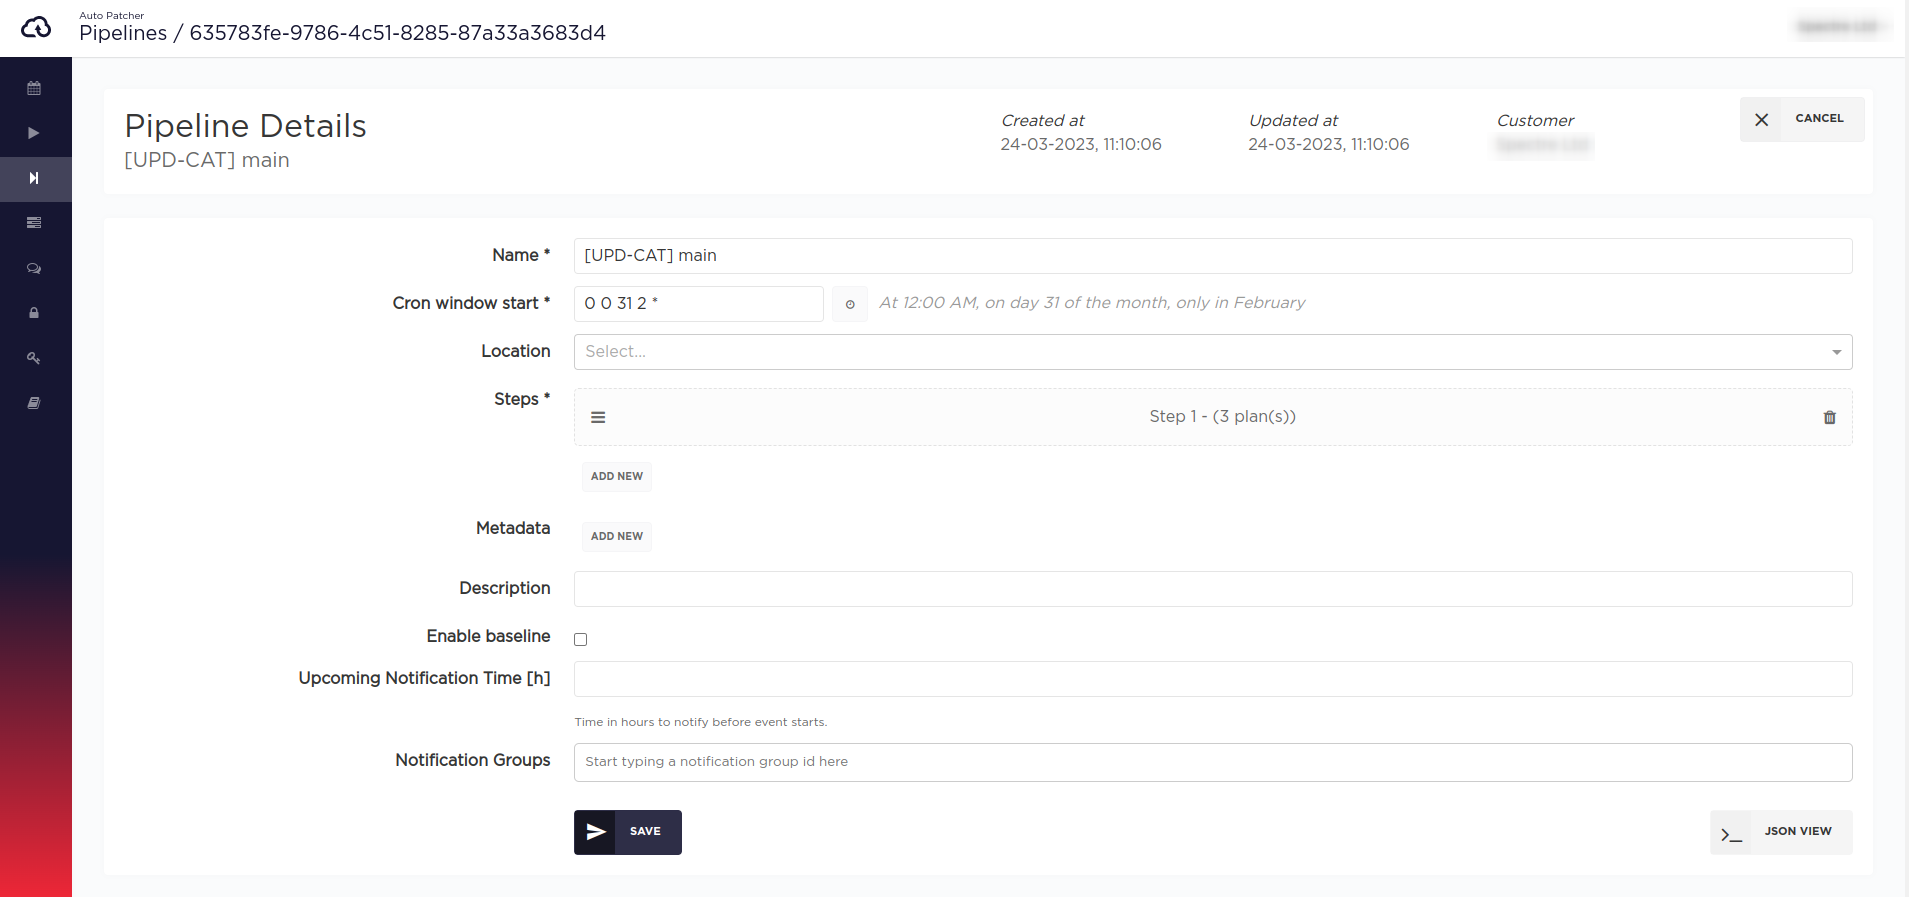
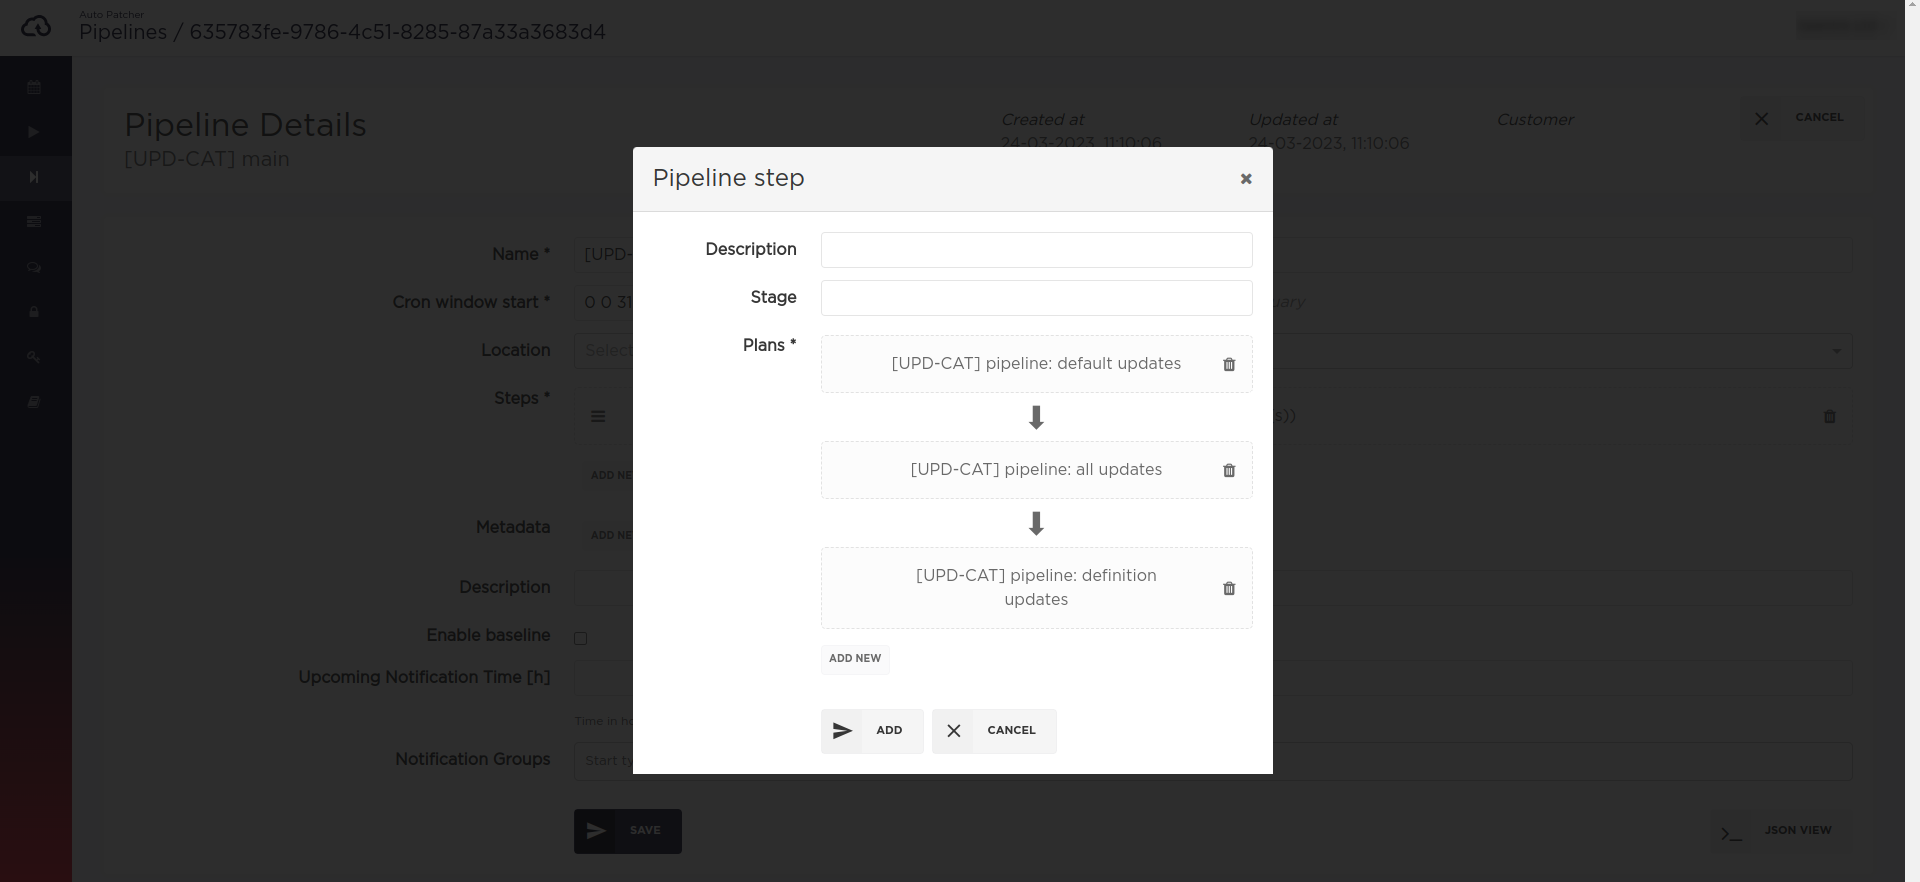
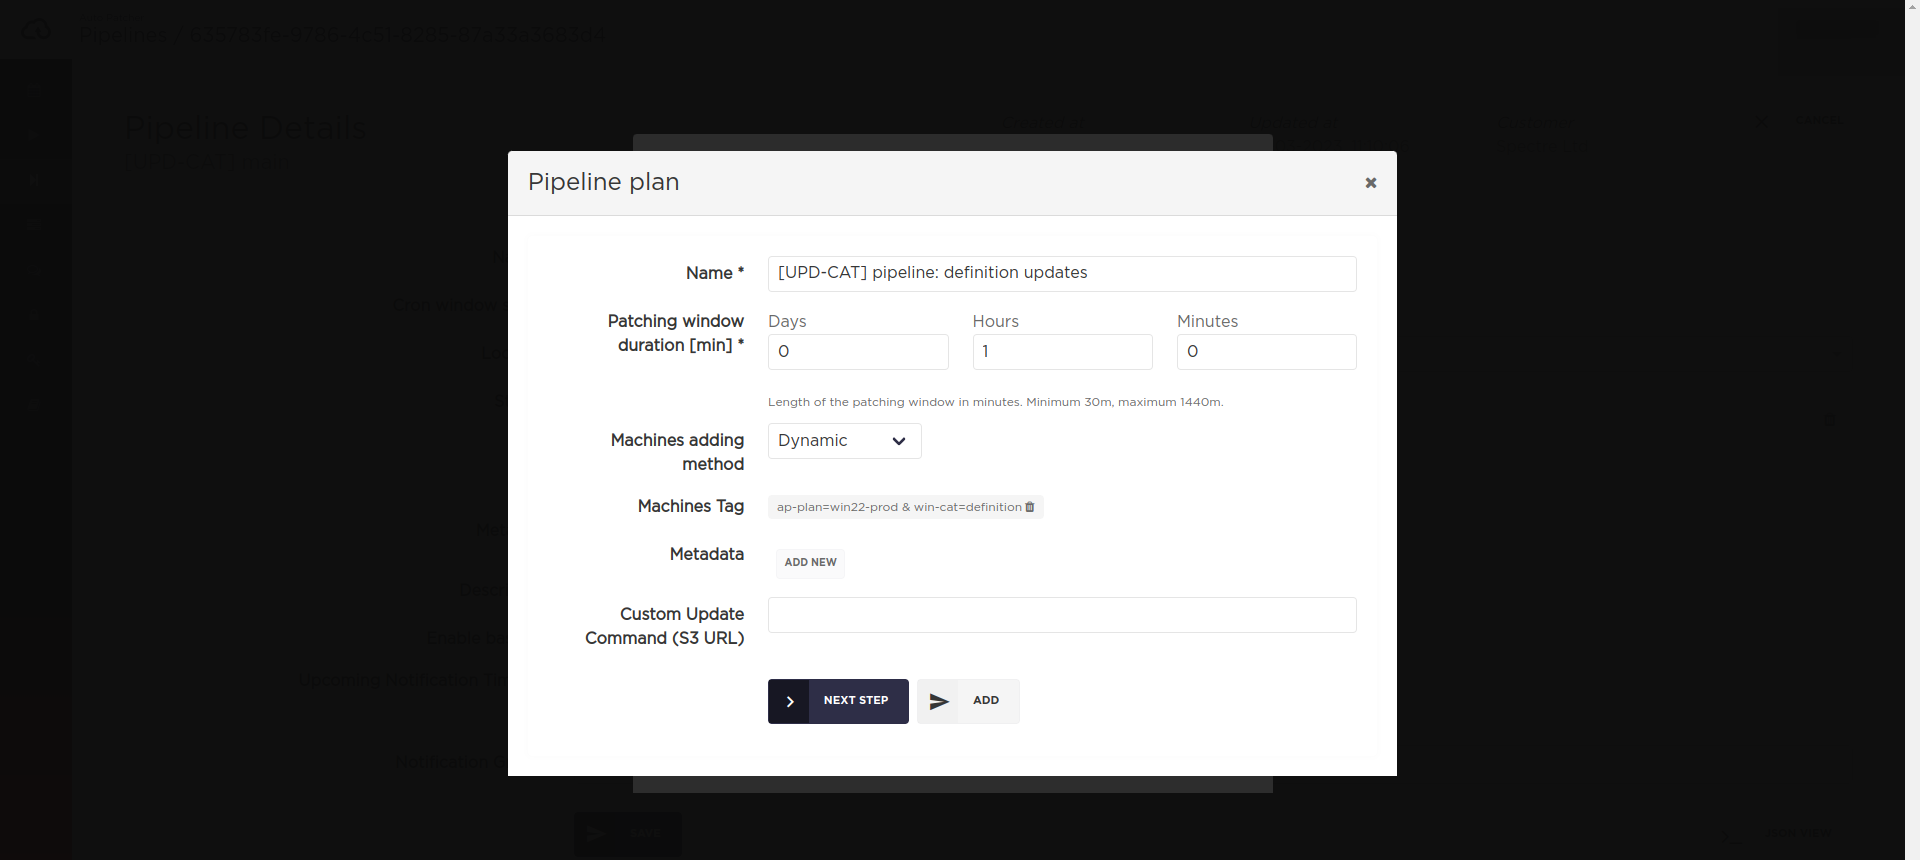
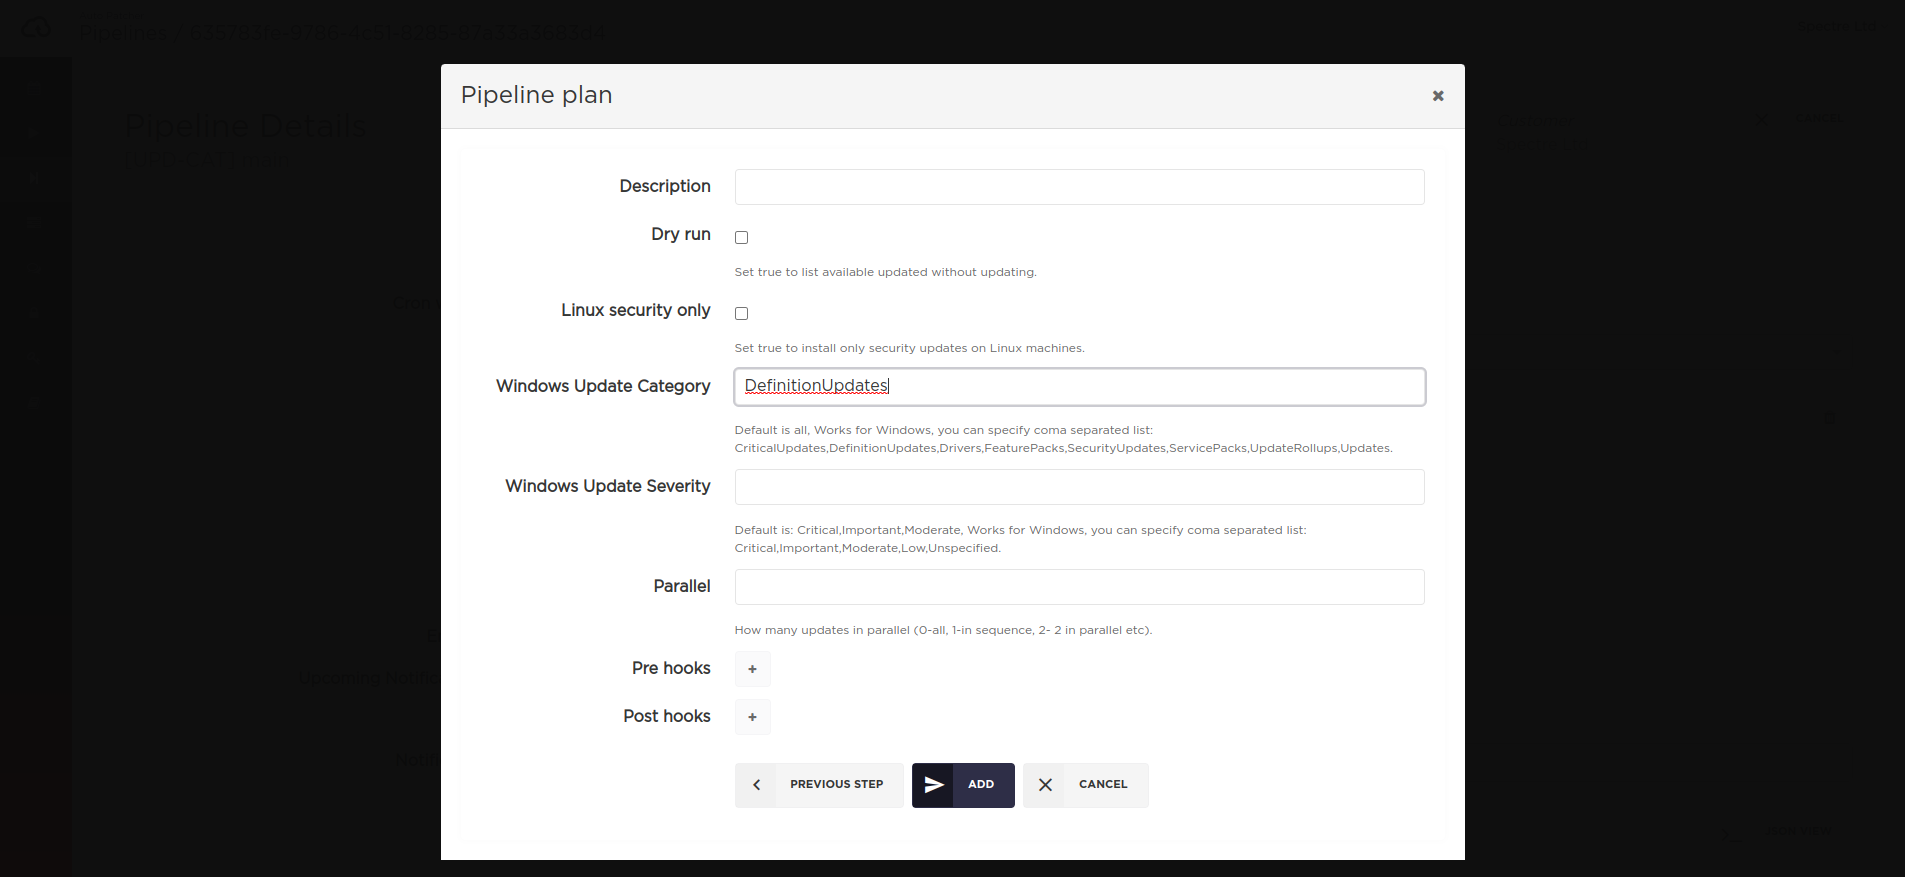
CLI/API
Pipeline payload:
{"name": "[UPD-CAT] main","cron_window_start": "0 0 31 2 *","steps": [{"plans": [{"name": "[UPD-CAT] pipeline: default updates","window_length": 60,"machines_tag": {"regions": ["eu-central-1"],"iam_role_list": ["arn:aws:iam::000000000000:role/example-role"],"reboot_policy": "ALWAYS","update_existing": true,"tag_condition": {"expression": "ap-plan=win22-prod & win-cat=default"}}},{"name": "[UPD-CAT] pipeline: all updates","window_length": 60,"machines_tag": {"regions": ["eu-central-1"],"iam_role_list": ["arn:aws:iam::000000000000:role/example-role"],"reboot_policy": "ALWAYS","update_existing": true,"tag_condition": {"expression": "ap-plan=win22-prod & win-cat=all"}},"windows_update_category": "Application,Connectors,CriticalUpdates,DefinitionUpdates,DeveloperKits,Drivers,FeaturePacks,Guidance,Microsoft,SecurityUpdates,ServicePacks,Tools,UpdateRollups,Updates"},{"name": "[UPD-CAT] pipeline: definition updates","window_length": 60,"machines_tag": {"regions": ["eu-central-1"],"iam_role_list": ["arn:aws:iam::000000000000:role/example-role"],"reboot_policy": "ALWAYS","update_existing": true,"tag_condition": {"expression": "ap-plan=win22-prod & win-cat=definition"}},"windows_update_category": "DefinitionUpdates"}]}]}
To create this pipeline in CLI save the payload into the file named pipeline.json and run the following command:
nc-autopatcher-cli create pipeline --file pipeline.json
Precedence
The update category and/or severity defined on a plan level takes precedence over the the same settings defined for a machine.
For example if the machine presented below
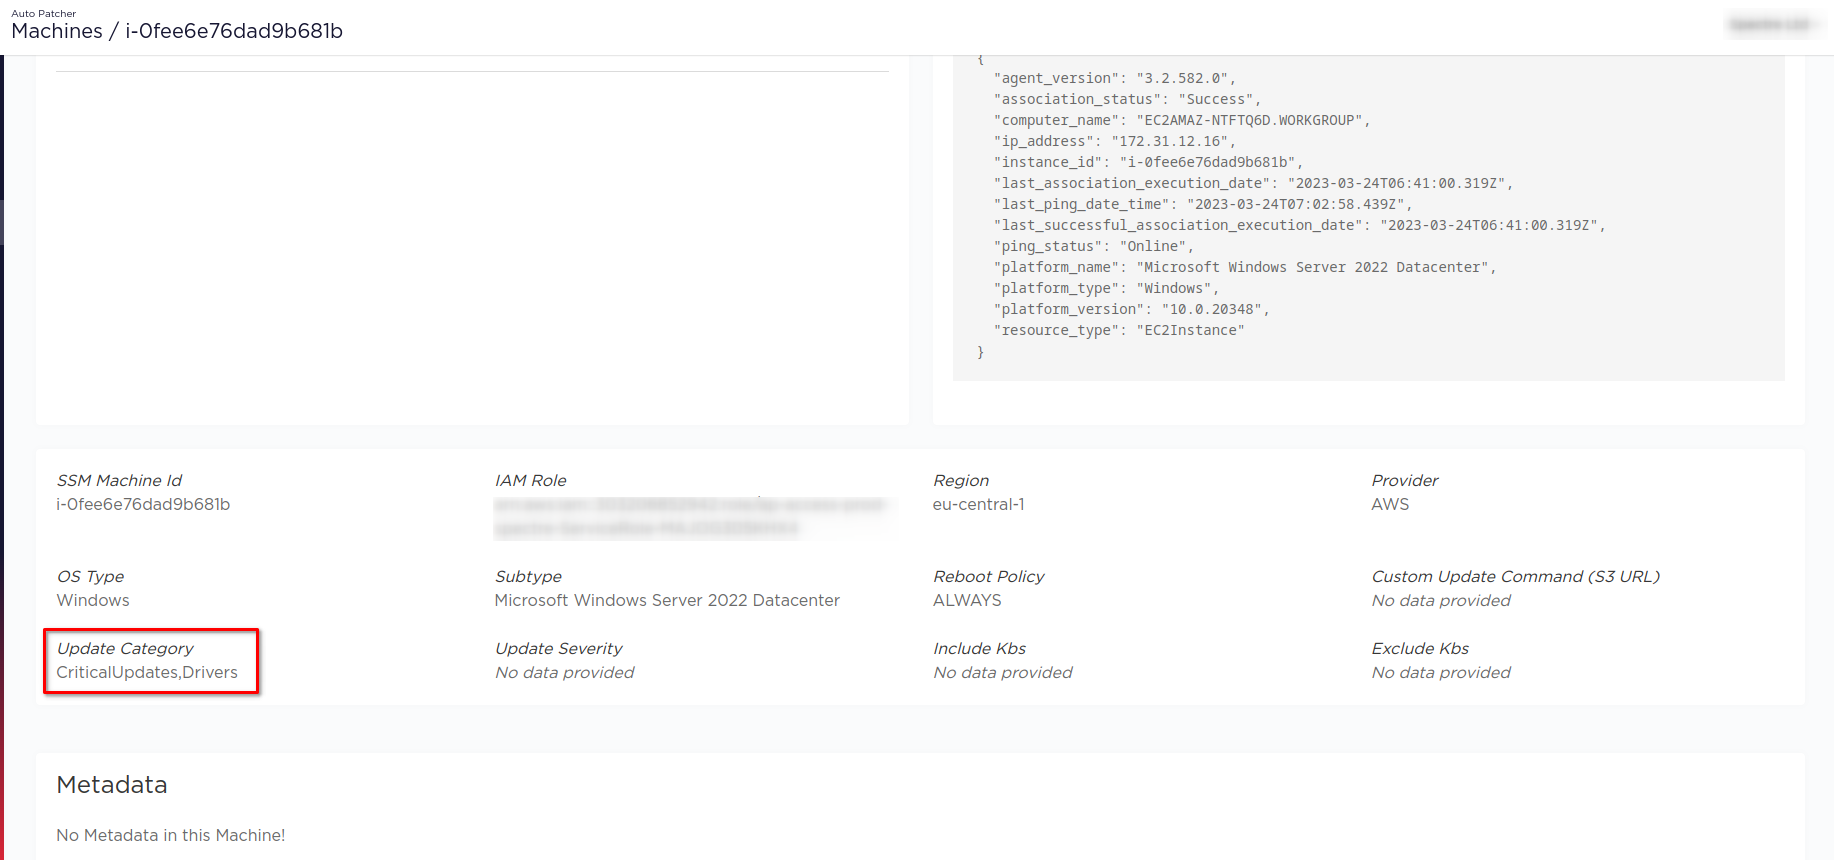 is added to the plan as shown below
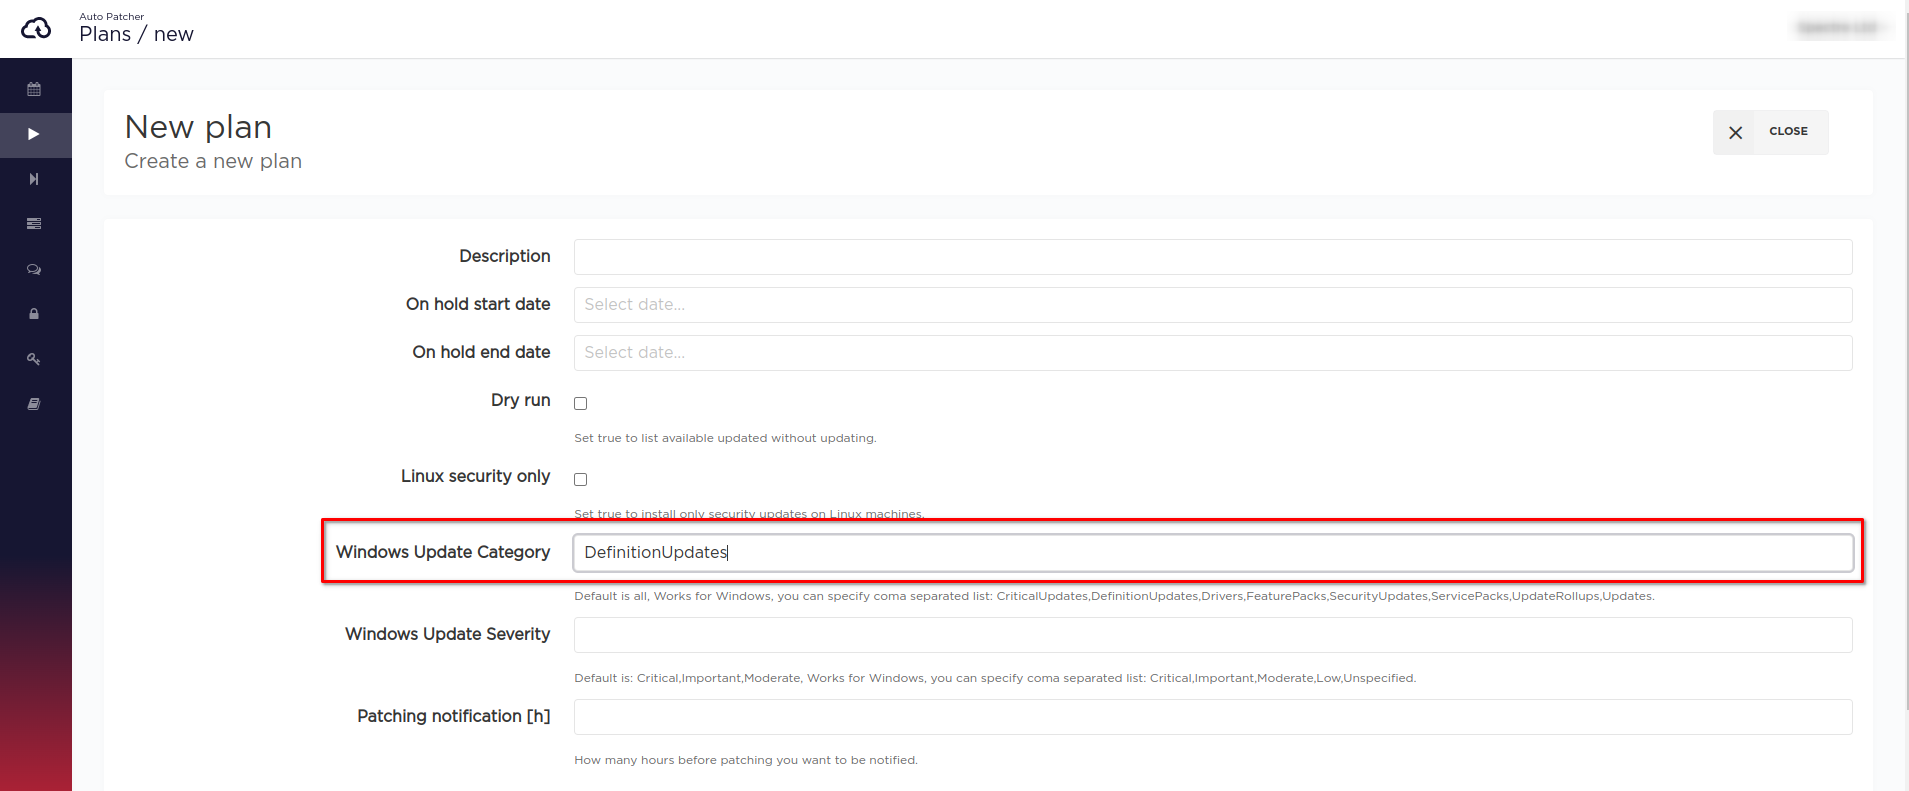
the patching operation will only install DefinitionUpdates on the machine.
Custom patching script
By default AutoPatcher performs patching action using the OS's default package manager. The details for each supported OS type is described below.
Linux
On Linux machines AutoPatcher invokes a predefined shell command which is different for each type of distribution.
APT-based (Ubuntu, Debian, etc.)
export DEBIAN_FRONTEND=noninteractiveexport UCF_FORCE_CONFFNEW=1apt-get update && apt-get -o Dpkg::Options::=--force-confdef -o Dpkg::Options::=--force-confnew -y upgradeYUM-based (Amazon Linux, Red Hat, CentOS, etc.)
yum update -yZypper-based (OpenSUSE, SUSE Linux Enterprise Server)
zypper refreshzypper update -y
Windows
For patching Windows machines AutoPatcher uses a slightly modified version of the AWS default AWS-InstallWindowsUpdates SSM document.
Custom
When the special case requires a custom patching action, it can be defined in the form of a script (shell script for Linux and Power Shell for Windows). The script has to be uploaded to S3 and be accessible by AutoPatcher AWS account (286863837419). The URL of the uploaded script can later be specified in three different ways each of which is described below.
Note: AutoPatcher supports s3://-style as well as https://-style (both path-style and virtual hosted-style, read more) S3 URLs.
Per machine in plan
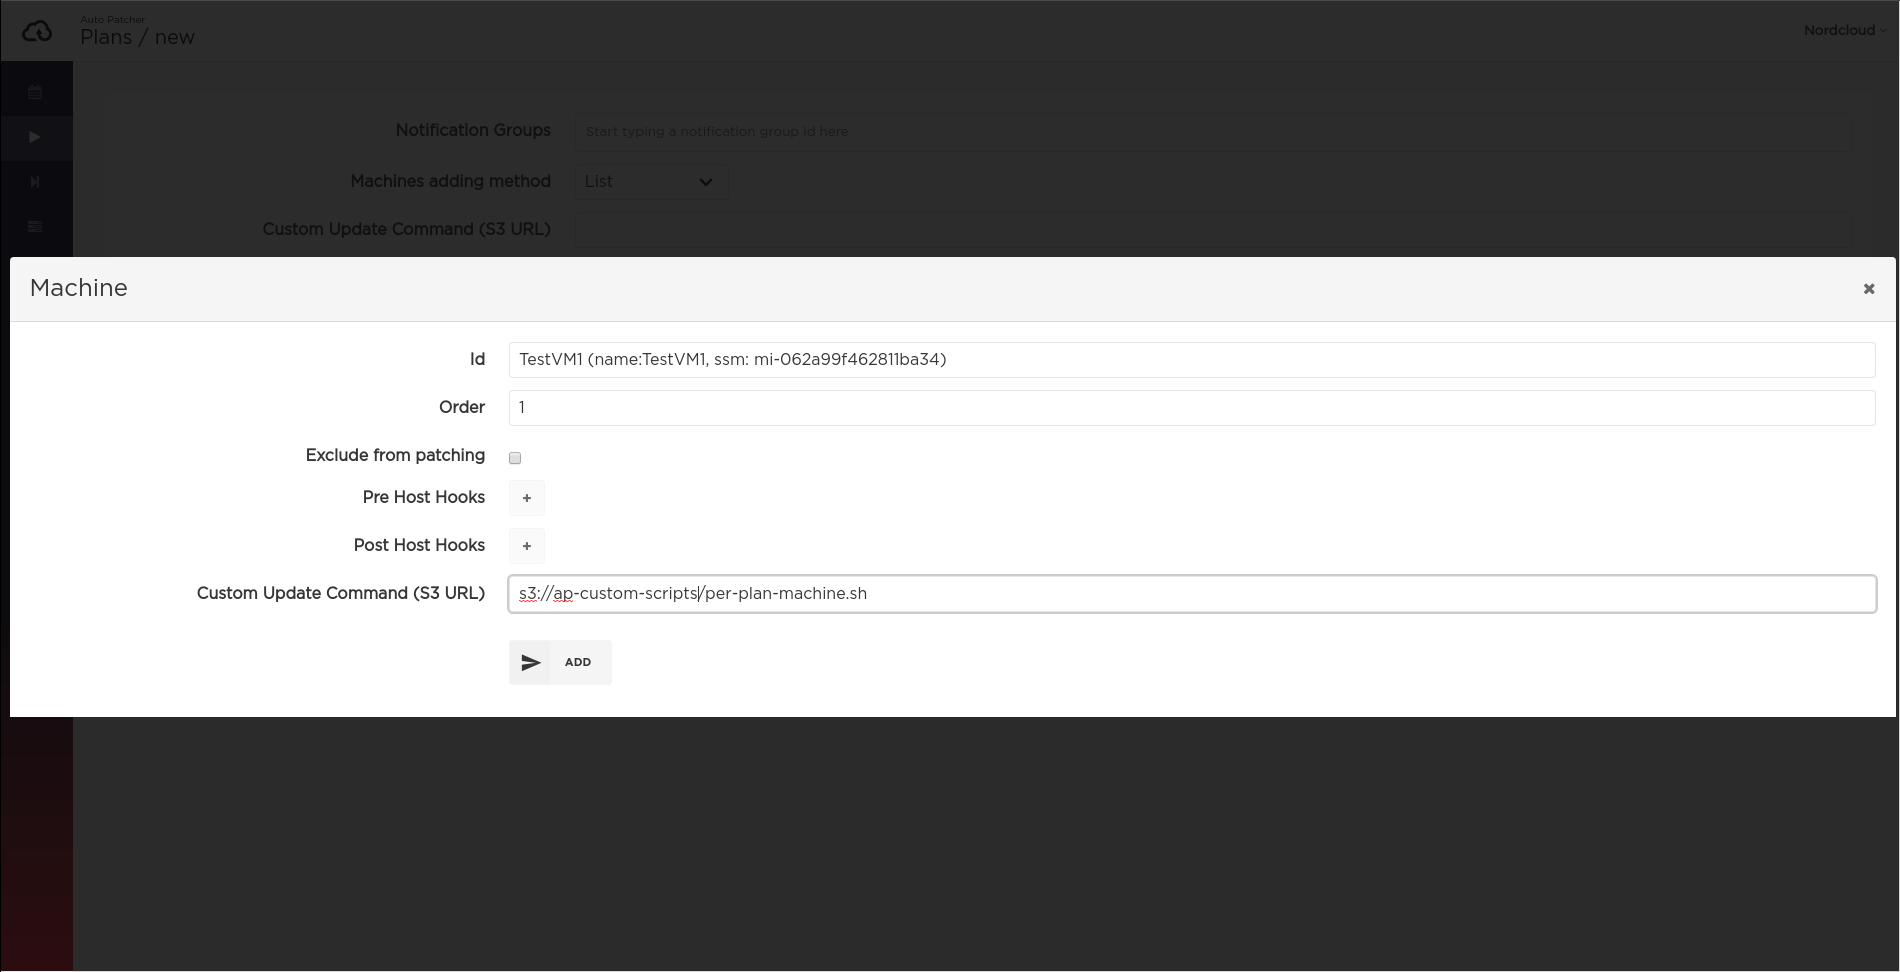
Applies to the specific machine in the specific plan. Overrides all other custom script settings.
Per machine
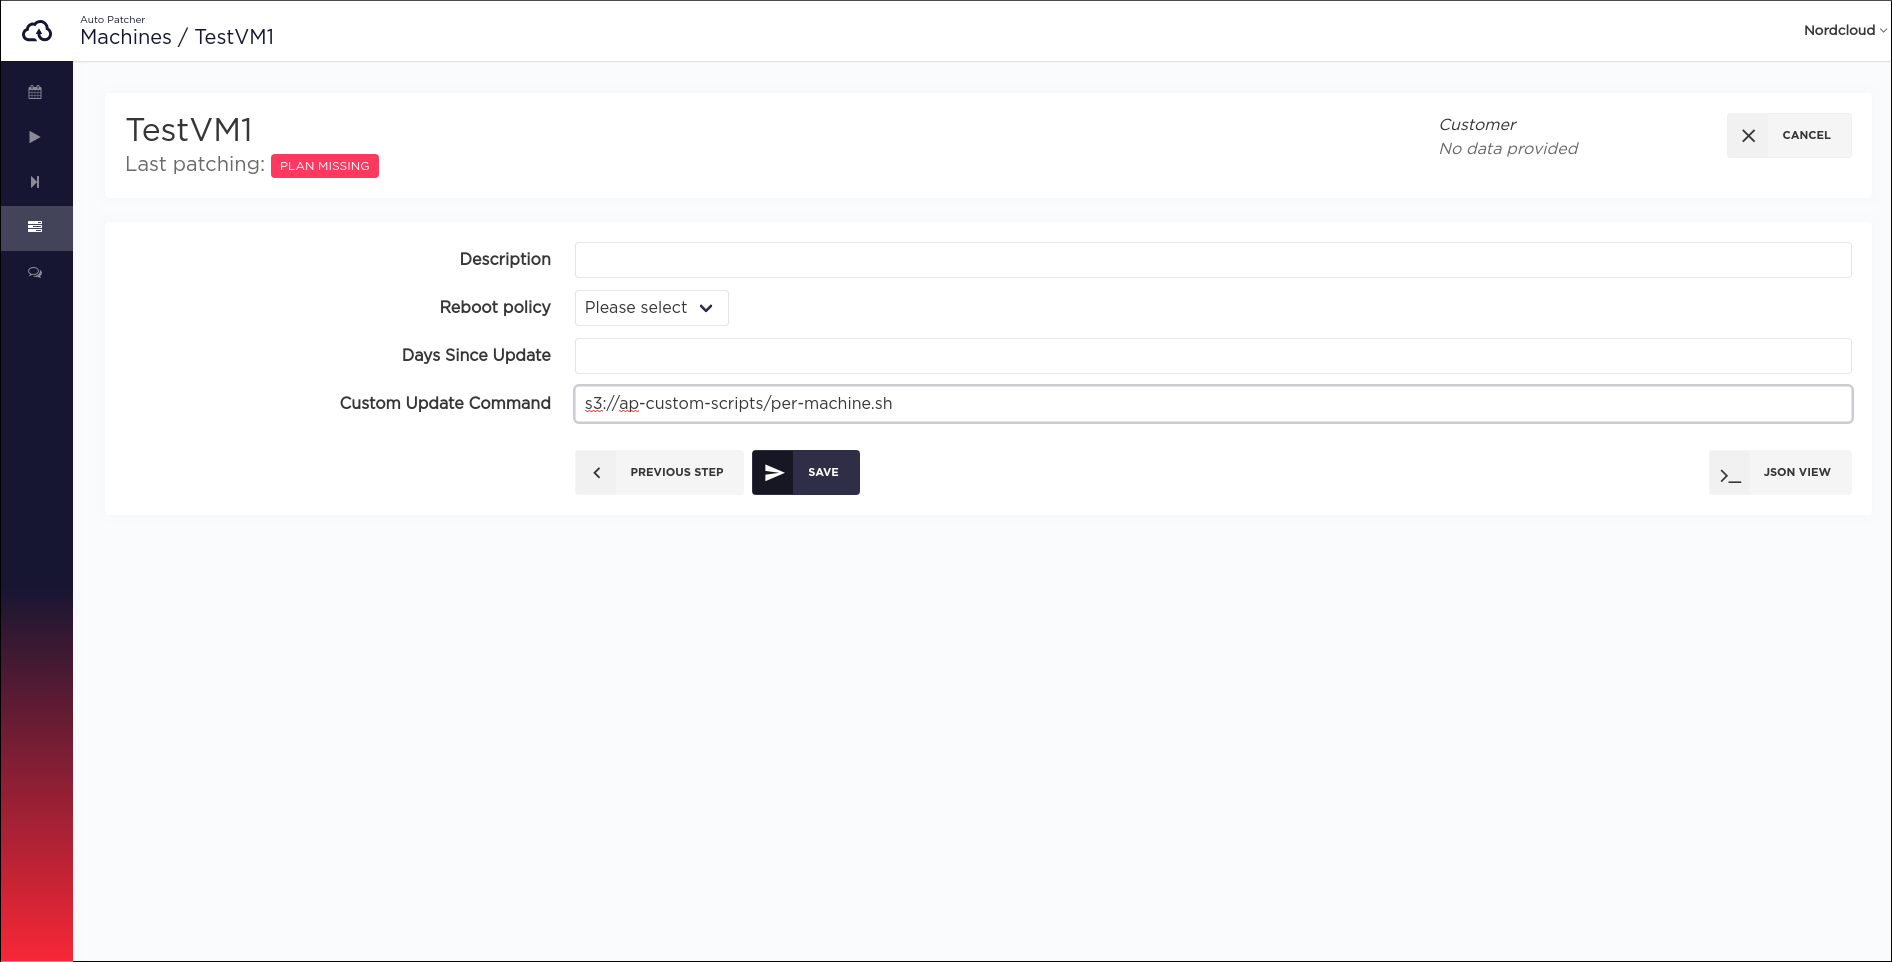
Applies to the specific machine in all plans. Overrides per-plan custom script settings.
Per plan
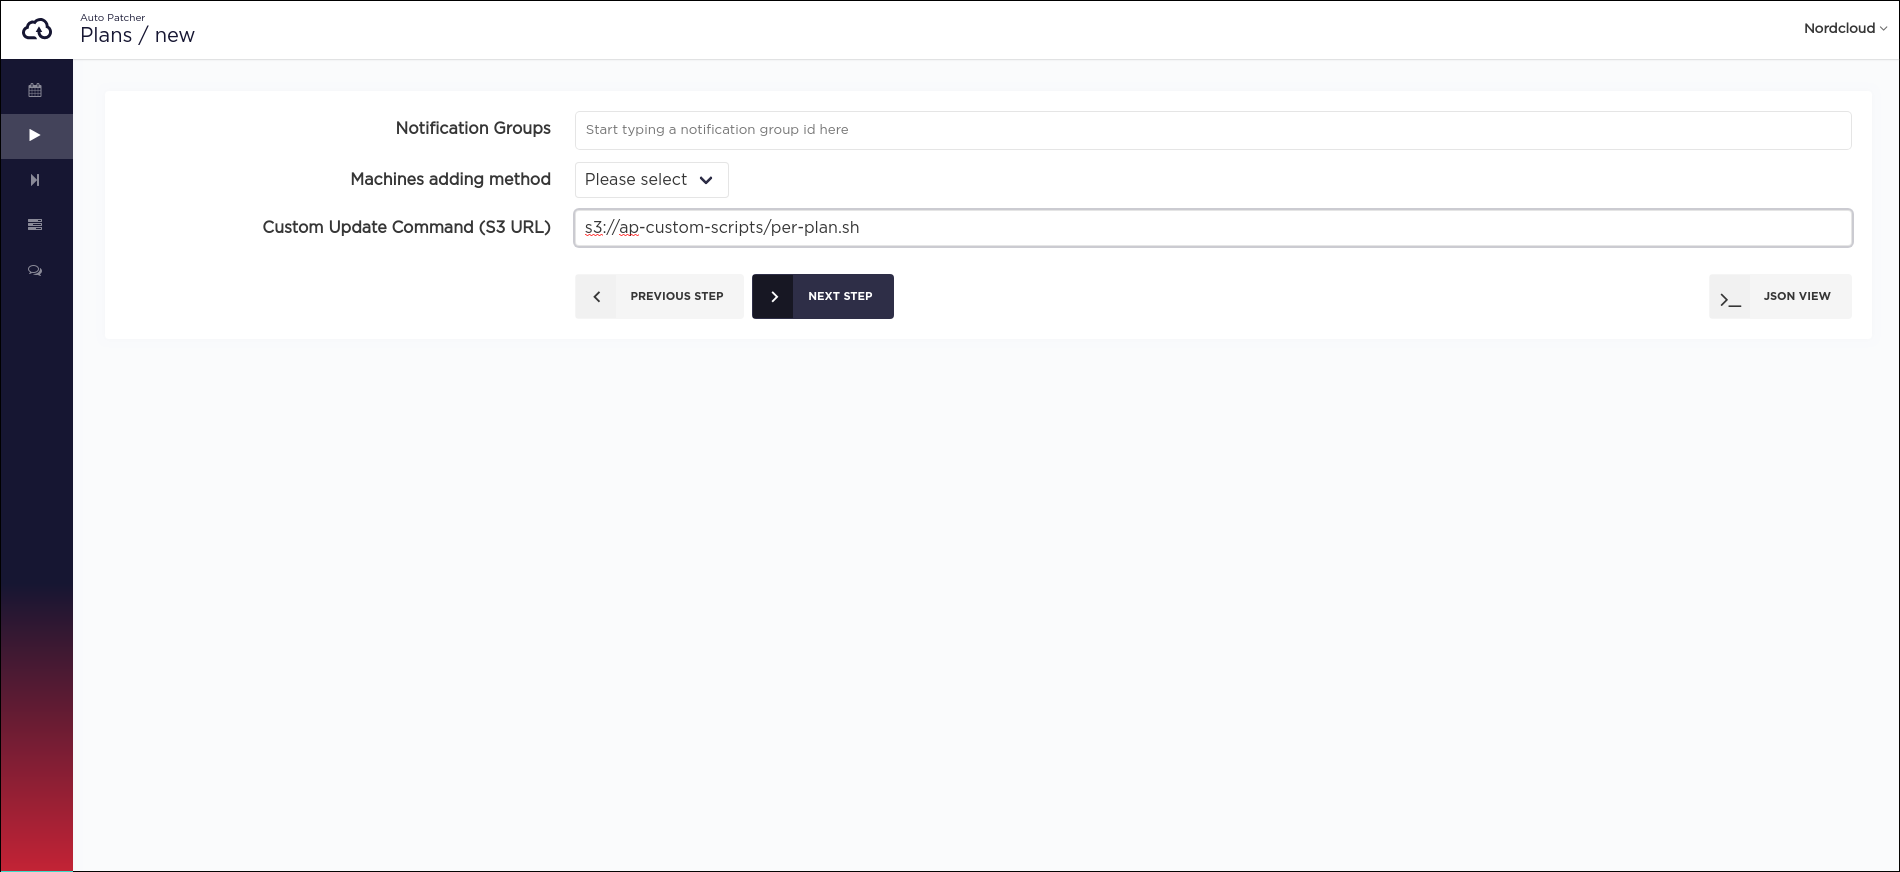
Applies to all machines in the specific plan.
Excluding machines from the plan
Below you can see how to exclude machines from being patched in the plan. When you change the plan, all events generated before from this plan will be deleted and the new one will be created.
Plan → Edit plan → Next step → edit machine → exclude machine → save plan
Force patching
Force patching means to execute a plan immediately (out of the defined schedule). It can be done by pressing a button shown on the image below.
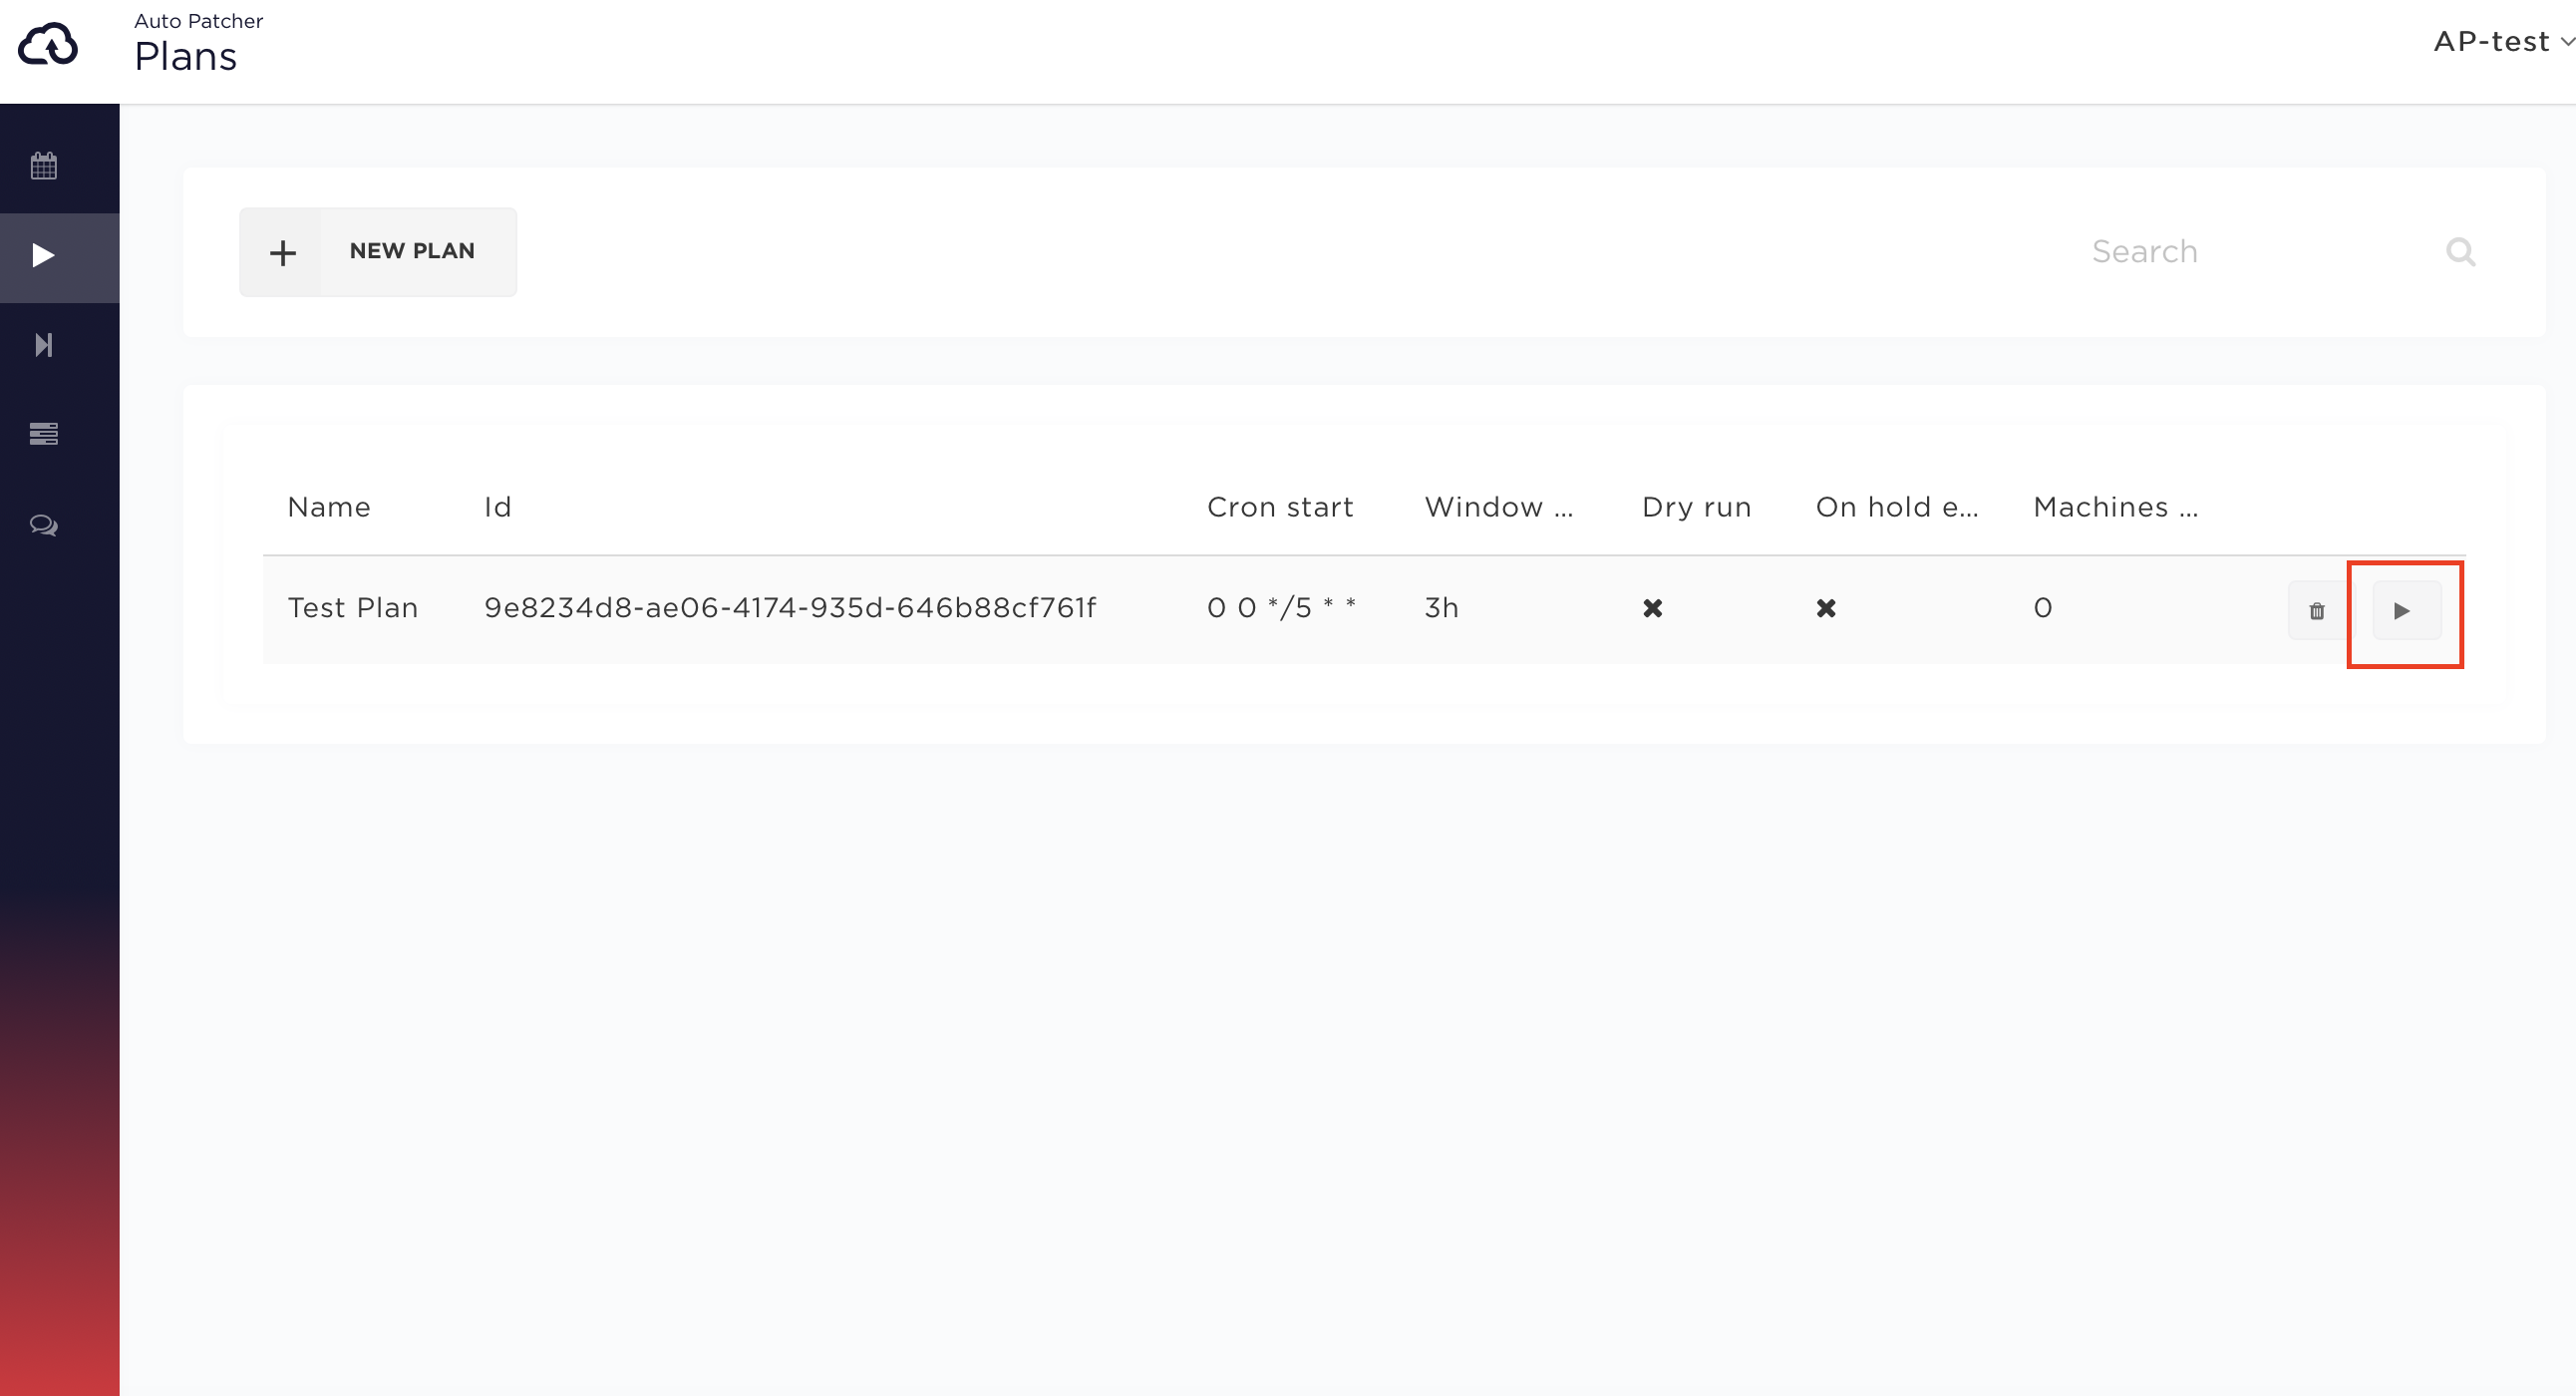
In this case a single patching event is created and scheduled to execute within 5 minutes after the force patching button was clicked.
Pipeline force patching
A pipeline can be executed in the similar fashion.

Move existing plan into pipeline
For existing plans there is an option to move them into pipelines. To do that, in the User interface go from left navigation bar to Plan pipelines and select destination pipeline. Then click Move plan button and you should be able to choose existing plan and move it between steps. There is an option to append new plan to existing step or insert it as a new step. The latter requires step delay input which will show accordingly to input. In a special case when the plan is inserted at the very beginning of the pipeline, the step delay will be applied to the old first step, which in effect of the plan movement will become second.
Install only security updates on Linux hosts
While defining a plan, you can select a setting which will tell AutoPatcher to install only security updates on all Linux machines added to the plan.

If there are Windows machines included in the plan, this setting will have no effect for them.
Older versions of Red Hat and CentOS require additional Yum plugin. Without it, the patching with this checkbox selected will fail. More information about the plugin available here (Red Hat) and here (CentOS)
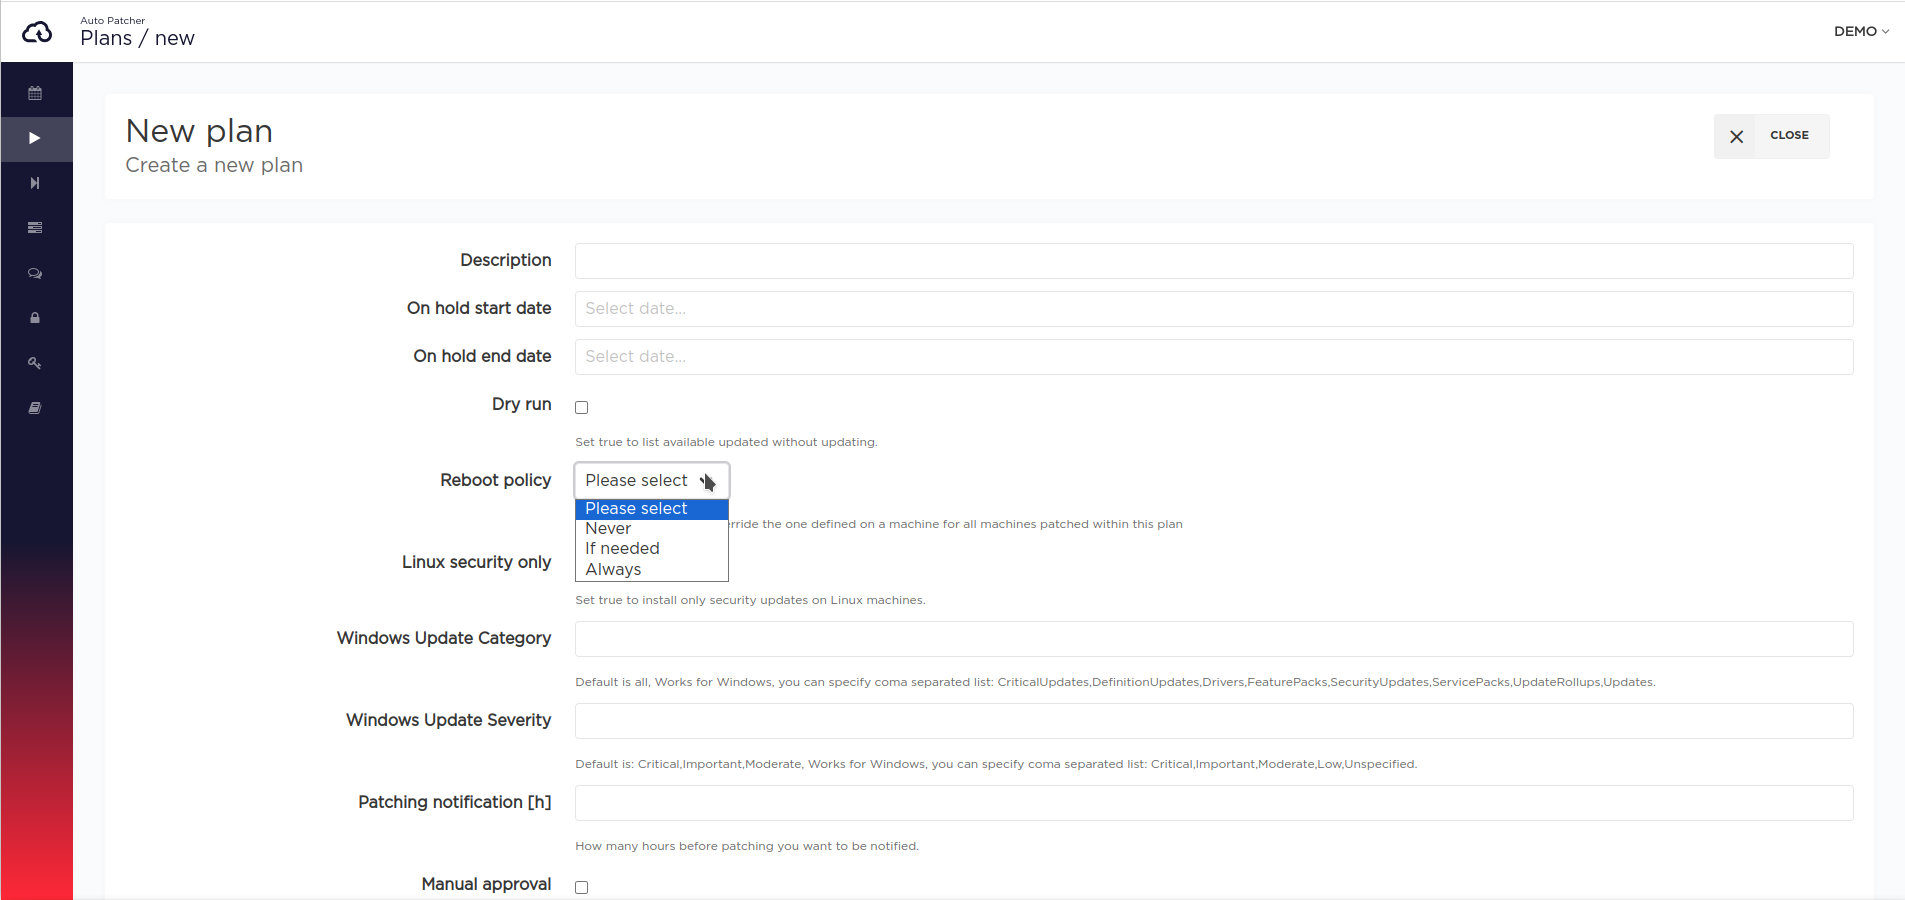
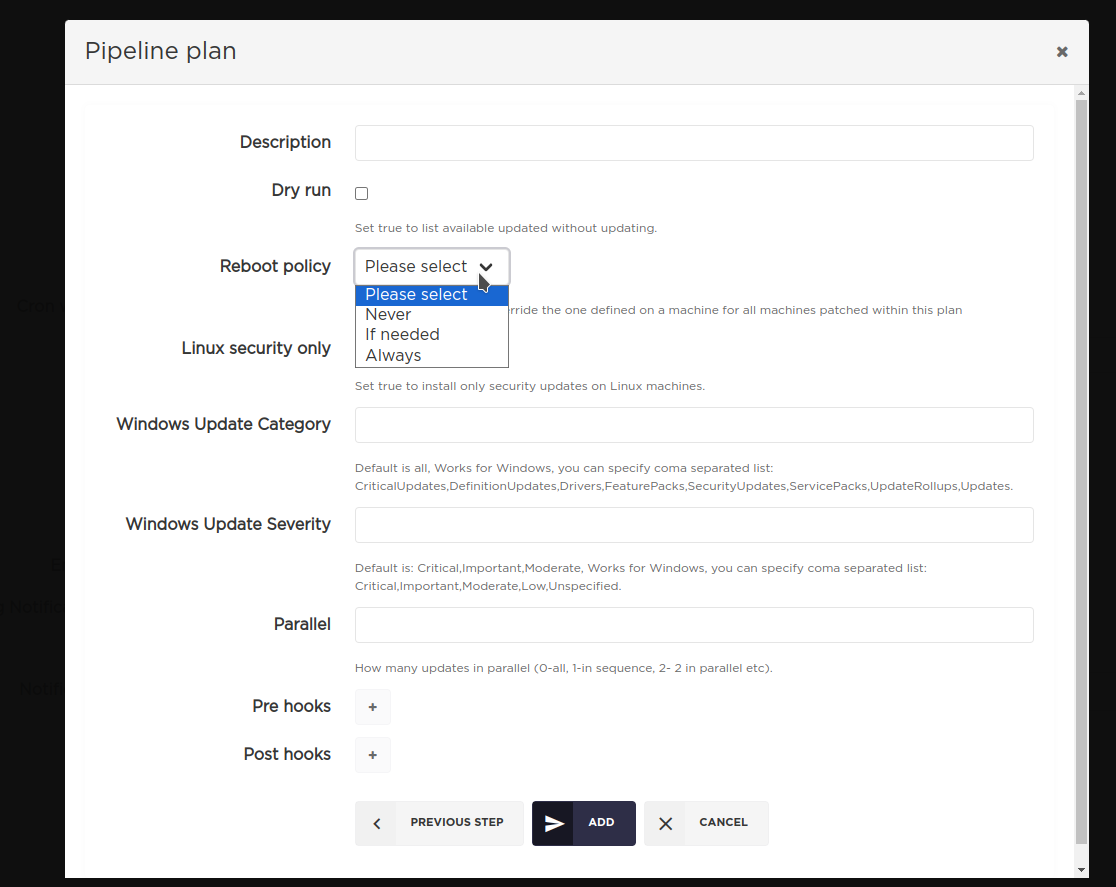
Reboot policy for plan or pipeline
Since the version v1.135 of AutoPatcher, it is possible to set the Reboot policy for a plan, a standalone and inside a pipeline as well.
If defined, it will override the reboot_policy and legacy allow_reboot settings for machines belonging to that plan,
but only for patching inside this plan.
UI
[UI] Defining reboot policy for a plan
[UI] Defining reboot policy for a plan inside a pipeline
CLI
Please note, that in order to use this feature in CLI, you need to download the latest version of the CLI (at least v1.135).
[CLI] Defining reboot policy for a plan
An example plan JSON definition to be used with nc-autopatcher-cli create plan:
{"cron_window_start": "0 0 31 2 *","window_length": 1,"name": "reboot-policy-test","reboot_policy": "ALWAYS","machines": [{"id": "7c5e29dc-57aa-462f-9792-eefb9070fa55","name": "test"}]}
[CLI] Defining reboot policy for a plan inside a pipeline
An example pipeline JSON definition to be used with nc-autopatcher-cli create pipeline:
{"cron_window_start": "0 0 31 2 *","name": "reboot-policy-test","steps": [{"plans": [{"name": "[reboot-policy-test] No plan policy","window_length": 60,"machines_tag": {"tag_condition": {"expression": "ap-stage=dev & step=1"},"iam_role_list": ["arn:aws:iam::000000000000:role/AutoPatcher-ServiceRole"],"regions": ["eu-central-1"],"reboot_policy": "IF_NEEDED"}}]},{"step_delay": 0,"run_immediately": true,"plans": [{"name": "[reboot-policy-test] Plan policy NEVER","window_length": 60,"reboot_policy": "NEVER","machines_tag": {"tag_condition": {"expression": "ap-stage=dev"},"iam_role_list": ["arn:aws:iam::000000000000:role/AutoPatcher-ServiceRole"],"regions": ["eu-central-1"]}}]}]}
Important information
- The maximum patching window duration is 24h
- Cron window minimum period is 3h (you can't create a plan which would run more frequently)
- When instance patching takes more time that time window length - it will result with the
TimedOutstatus. In this case we advice to check patching manually and increase time window if it's possible. - 5 minutes after a plan is created or updated you should be able to see the events generated for the next 30 days.
- In case a plan is updated all the old events coming from the plan with status
UPCOMINGare removed and replaced by newly generated events.